Friday, October 25, 2013

Create a Grow Heap This Fall For Squash Next Year

One of the speakers who I had the pleasure of seeing several times at the Mother Earth News Fair was Barbara Pleasant. It almost felt like I was listening to an old friend speak since I had read so many of her articles in Mother Earth News.

In her workshop about composting, Barbara talked about how easy it is to grow squash in a Grow Heap. A Grow Heap is basically a giant compost pile that you create in the fall. You can either nestle transplants in the heap in the spring, or simply bury open-pollinated (remember - hybrids will not reproduce true) squash in the compost in the fall. The squash itself will decay into the pile during the winter, but the seeds will sprout in the spring.

Here's where she really got my attention: Barbara said she raised 100 lb of pumpkins this year in one Grow Heap.  That's a ton of food for very little effort, so I knew we had to give it a go.


Our grow heap under construction

When we started to clear our garden of summer annuals as the first frost became imminent, we carried the garden waste over to a 12' x 4' spot that is contiguous to our sunflower patch. We layered brown materials (such as completely dried leaves and sunflower stalks) with luscious green materials (basil, marigolds, borage, comfrey, etc.). We made sure not to remove too much dirt from the roots of the plants we pulled out of the garden because, according to Barbara's book, The Complete Compost Gardening Guide, it is best to have about 20% of your pile consist of soil because it will help keep the plants from wilting under water stress. We did not include any plants from the Cucubit family (cucumbers, watermelon, squash, etc.) in the pile because we do not want to introduce any diseases that could affect next year's pumpkin crop.

We also had two compost bins of semi-composted rabbit manure and chicken litter available. We dumped that over the top of the Grow Heap. At that point, the pile stood about 2-1/2 feet tall.


A couple of chickens check out the newly-emptied compost bins. We've started
 filling the bin on the left with the Cucubits we did not add to the Grow Heap. 

We plan to add yet more to the Grow Heap as fall progresses. We will add a couple bags of shredded leaves and grass clippings plus the remains of the hardy garden plants (cabbage, chard) when we pull them out.  The Grow Heap will be reduced in height by half when spring comes around, so it is good to make the pile large to begin with.We'll start pumpkin seedlings indoors sometime in April, and plant them in the heap in mid to late May. I'm hopeful that we'll get the biggest pumpkin crop we've ever had.

This was incredibly easy, so if it works, I'm sure Grow Heaps will become my go-to method for growing squash. If squash isn't your thing, you can also grow tomatoes in a Grow Heap. Any members of the Cucurbit or Solanaceae families should thrive in this environment.

Reference:

The Complete Compost Gardening Guide by Barbara Pleasant and Deborah L. Martin. HIGHLY RECOMMENDED

Friday, October 18, 2013

Road Trip! Our Visit to the Mother Earth News Fair

Hubby Dear and I set off for Lawrence, Kansas, last weekend to visit the Mother Earth News Fair. It is billed as an event for those interested in sustainable lifestyles. As a result, it attracts the crunchy-granola-hippy crowd, Joe and Suzy Suburbia, Old MacDonald (complete in bibbed overalls and straw hat), as well as the preparedness set. I think Hubby Dear and I probably fall under three of those four categories! I'll let you guess which one doesn't fit.

The Fair lasted for two very full days and we had so much fun! There were hundreds of booths offering information and products from herbal remedies to freeze-dried food to solar panels to gardening gadgets to animal castration devices. Interesting stuff! There was so much to look at and learn about that it was hard to fit it all in.  

The main attraction for me, however, was the speakers and workshops.

Temple Grandin

Renowned animal behavior expert, Temple Grandin, gave a fascinating talk about how to improve animal welfare.


David Schafer of Featherman Co., left, and Joel Salatin, right

Hubby Dear and I really enjoyed the poultry processing demonstration given by the inimitable Joel Salatin of Polyface Farm.  We are thinking about raising broiler chickens now after learning a few tricks of the trade.

In addition to these big name speakers, we attended lectures on raising mushrooms, dairy goats, and heritage pigs, composting, and beekeeping. There were so many interesting workshops that we could have attended had we been able to be in three or four places at once.

Some of the booty I brought home

I brought home a bag full of goodies, some of which you see in the above photo. I bought mostly books and other informational material, but I did buy one item of especial note.


A WAPI

I was able to pick a WAPI (Water Pasteurization Indicator) from the Sun Oven Company. The WAPI they used to sell came on a nylon cord and would burn or melt when being used to test water pasteurization anywhere else than a solar oven. This has been remedied in the product they currently carry, making it much more useful. 

If you are able to attend a Mother Earth News Fair, I highly recommend it. There are four fairs scheduled for next year: 

April 12-13, 2014 Asheville, NC
May 31- June 1, 2014 Puyallup, WA
September 12-14, 2014 Seven Springs, PA
Date TBD, Lawrence, KS

Tuesday, October 15, 2013

How to Cook an Old Rooster

There comes a time in the life of every chicken-keeper when you have to make some tough decisions. When laying hens get over two years of age, their rate-of-lay drops precipitously. Unless you want to start buying your eggs from the store and run an elderly chicken retirement home, you need to have another generation of pullets coming into lay and to butcher the old birds.

Our main laying flock will be two years old in the spring, so their days on our homestead are unfortunately numbered. The rooster of that flock became a vile jerk and only seemed to get worse with age, so he met his end before the rest of the bunch. He attacked any human - other than me, usually - who dared to enter his domain. He was rough on the ladies in his harem and had recently started to aggressively attack any chicken who dared to eat when I scattered treats in their run. It was time for Mr. Rooster to go.


Mr. Rooster was calm on his way to the killing cone. He was such a
gorgeous Buff Orpington, but was a complete tyrant. 

The problem with old chickens is that they tend to be tough. You definitely will not want to fry an old, heritage breed bird unless you like leathery chicken. An older rooster or retired laying hen calls for being cooked for a long time over low, moist heat.

Here are the two ways I used our tough bird: Rooster and Dumplings and Bone Broth. The broth from an older, heritage breed bird is outstanding, and lends great depth of flavor to these simple preparations.


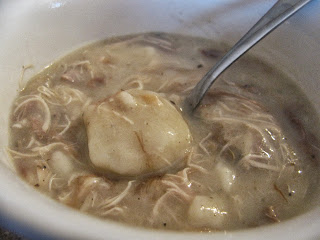
Rooster and dumplings


Enjoy!


Rooster and Dumplings

1 whole rooster or stew hen
3-1/2 t. salt, divided
3/4 t. pepper, divided
1/2 t. garlic powder
1/2 t. dried thyme
1/4 t. ground red pepper

FOR DUMPLINGS:
3 c. all-purpose flour
1-1/2 t. salt
4-1/2 t. baking powder
1/2 t. poultry seasoning
1/3 c. shortening
2 t. bacon drippings
1 c. milk

Place the chicken in a large, heavy pot such as a Dutch oven. Cover with water and add 2-1/2 t. salt, 1/2 t. pepper, garlic powder, thyme, and red pepper. Bring to a boil, cover, and reduce heat to low. You want to cook the chicken very slowly so it isn't tough. Cook for about 5 hours at a very low simmer.

Remove the chicken carcass from the broth; cool slightly, and then pull the meat from the bones. Skim the fat from the top of the broth. Chop or shred the meat and then add it back to the broth. Reserve the bones for making bone broth (see following recipe). Add remaining salt and pepper to broth, taste, then adjust seasoning, if necessary.

Combine flour, salt, baking powder, and poultry seasoning in a medium-sized bowl. Cut in shortening and bacon drippings until the mixture is crumbly throughout. Add milk and stir until everything is moistened.

Roll dumpling dough out on a floured surface to 1/8" thickness. Cut into 1" squares.  

Return broth mixture to a boil, then drop the dumplings one at a time into the broth. Go slowly and stir gently to make sure they do not break or stick together. Reduce heat to low, cover, and simmer, stirring often, for 25 minutes.


Note: If you aren't using an old bird, you do not have to cook it so long. Two hours would probably be sufficient for your typical broiler chicken. The broth will not be as flavorful, though, so you might want to supplement the broth with a chicken bouillon cube.


Nutritious Bone Broth

2 chicken carcasses - you only need the bones
Water
Salt and pepper
2 T. apple cider vinegar
3-4 cloves of garlic, peeled

Take the chicken carcasses and put them in the bottom of a 6 qt. slow cooker. Cover with water, add 1 t. salt and pepper to taste, and other ingredients. Cook on low for 24-48 hours. The combination of long cooking and the vinegar will help dissolve the healthy minerals from the bones. I usually cook this for 48 hours and remove the garlic cloves after the first day. Cool and freeze in freezer-safe containers.  Use in any recipe that calls for chicken broth.