Monday, April 30, 2012

April 2012 in Review

Another month went by at the speed of light. Whew! I hope you all had as productive an April as I did.

Hubby Dear and I spent a lot of time out in the garden. We are finally making great strides on our homestead and it feels awesome. Namely, we have an orchard in the ground instead of just dreams of one.


Mint and Sage blossoms in the herb garden

The first radishes of the year were ready to be eaten.

"Purple Plum" radish


This is just a tiny percentage of the radishes we have eaten and of what is still growing in the garden.

Noodles the Silver Lakenvelder somehow made it into the garden.
She's kind of a spazz.  

The occasional chicken escapee didn't harm anything.


Garden on April 29


Raindrops on "Sugar Sprint" Pod Pea blossoms


We've already enjoyed salads from both the "Encore" salad mix and "Corvair" spinach


I'm excited to report that our Swiss Chard is actually growing!
It is growing slowly, but a marked improvement over last year. 


"Chester" blackberries in full bloom. 


One of our new "Heritage" raspberry canes

We're doing our best to keep the weeds back from our new raspberry plantings. It's hard to keep up on this, but it's really important. When the new sprouts emerge and grow tall, we'll be able to mulch, but until then, we've got to do it by hand. If the weeds get ahead, they will choke out the baby raspberries. I found that out last year!


Apple trees 


Our newly planted apple trees have leafed out and look great.


"Bluecrop", "Blueray", and "Earliblue" blueberry bushes


One of the big tasks we completed this month was to plant our blueberries. A longer post about the blueberries will be coming soon, I hope. I'm spending so much time outdoors that I don't get the computer time I used to.

We mulched and mulched and mulched everything we can get our hands on. That's another post I haven't gotten around to.

How I spent my prepping budget this month:

I know there are people who raise chickens on a budget, but I am not one of those people. I keep learning about things that would make my life easier or more convenient. Then I buy them and use up all  my prepping budget. It is going to take a looooong time before we break even on all our chicken expenses.


Storage for chicken feed

We are storing our chicken feed in metal trash cans. They are supposedly water-tight, but I found that after a heavy rain that the feed inside was damp in places. Not good! I shopped around and found this Rubbermaid storage shed that fits both of my feed cans with room for a few extras.

One can is for feed, the other for bags of scratch,
DE, grit, etc. 


I have been fighting a losing battle trying to keep pine shavings out of the chickens' food, water, and grit. It is better now that they spend most of their days outside, but I think the money I spent on an easy maintenance feeder, waterer, and grit dispenser is worth it.


New feeder, grit dispenser, and waterer


I also got a rake for maintaining the litter in the coop. We are using the deep litter method of manure management. All I have to do is keep adding litter and turn it occasionally to make sure it doesn't get moist or compacted in areas. Believe it or not, my coop doesn't smell at all and I'll only have to clean it out a couple times a year.

My last chicken-related prepping purchase was to make a dust bath. That's another post for the future. (Man, I am behind, aren't I?)

After all that, I didn't have much budget left. I did buy a can of freeze dried chicken and a Katadyn Hiker Water Microfilteras part of our bug out bag upgrade.


Gratuitous Chicken Pics

I can't have a post that summarizes April without including photos of our backyard inhabitants. The chickens have learned a lot this month. They now wait eagerly for the automatic chicken door to open in the morning. They've learned the layout of the chicken moat and most of them can figure out how to navigate back to the coop without getting lost. Most importantly, they now put themselves to bed as night falls. It was getting old crawling army-style through chicken poop to try and catch those little buggers under the coop every evening.


I love having a mixed flock. Aren't they pretty?


Exploring the moat


Our rooster, Doofenshmirtz


And that's our April! What did you accomplish this month? 

Wednesday, April 18, 2012

Our Homestead in Pictures, Mid-April Edition


The scent of this Korean Lilac bush is the best thing I have ever smelled 


A neighbor gave a tiny potted lilac bush to me after the tragic death of my sister in a car accident. I planted it the following spring and it has grown to be enormous. Its heavenly scent reminds me that I will indeed see my sister again in Heaven someday. 


Baby cherries


Since I am attempting to nurse the cherry tree to back to health, I did some of the holistic sprays of spring during its bloom. The oils in the spray prevent blossoms from setting so any cherries we get will be especially appreciated. I thought the loss of the cherries was a small price to saving the entire tree. 


"Chester" blackberry blossom

Our "Chester" blackberries are blooming and the "Triple Crown"s are full of buds. I really hope we don't get a frost that will truly nip our blackberry harvest in the bud.


These are the berries that developed from these blossoms

The strawberries are developing quickly. I can't wait to taste that first berry. It is crazy just how much better homegrown strawberries taste than their counterparts from the store.

The strawberry plants we planted last month all appear to have survived. You can see them in the photo below (right side of the pic). They are all growing and some have even tried to put out flowers. We pinch them off since the baby plants need to focus on growth.


A shot of the north half of the garden

Compare this photo to the one taken  of the same view just two weeks earlier. Massive growth.


"GoldRush" apple tree in foreground, "Enterprise" in rear. The orange flag marks
the spot for our row of blueberries.

All of the apple trees are leafing out. I guess that sunny and windy day we planted them on didn't harm them too much. You can see that we put down some mulch around the trees. We used a particular kind of mulch and did it in a specific way. I know that sounds cryptic and I'll hopefully be able to post about it soon. I have to get my blueberries planted first, though.


Fishing line and bird scare tape will hopefully deter hawks

Our chicks are now five weeks old and are full-fledged little chickens. It is time to start giving them excursions into the great outdoors. First, however, we needed to do something to deter birds of prey. I often see hawks flying above our homestead and I do not want my chickens to become casualties. The chicken moat is supposed to be narrow enough that hawks won't want to risk snagging a chicken there. The main run, on the other hand, is a different story. Hubby Dear and I strung 50 lb. test fishing line back and forth over the run. Then I attached strips of bird scare tape to flap and flash in the sunlight.


This Salmon Faverolle is curious but cautious


The chickens themselves are a bit suspicious of this whole outside business. I suppose that's only natural since they have always been confined in one way or another. If we want them to go outside, it involves catching all the chickens and chucking them out the door. You don't even want to imagine what it takes to get them all back IN the coop after their outing. 

Chicken taming is a work in progress, that's for sure.  

Tuesday, April 10, 2012

How to Plant an Apple Tree

We've lived on our property for nearly five years and we have wanted to plant fruit trees from the beginning. Between Hubby Dear's grueling work schedule and the birth of two more children, we've had to postpone that plan. Last fall we were finally able to make a beginning; we set in motion our orchard plan and planted three baby pecan trees.

The additions to our orchard for Spring 2012 are three semi-dwarf apple trees and three highbush blueberry bushes. I'll cover the blueberries in a later post. :)

The first thing you need to do before you plant apple trees is find a good place for them on your property. Ours are located on the southwest corner of our 5 acres, the area we have set aside for the bulk of our fruit trees.

We marked the locations for the trees, taking their mature size into account and siting them well away from the pecans

The apple trees are just east of where we planted the pecan trees last fall. Since a mature pecan tree can have a canopy in the neighborhood of 80 feet in diameter, we made sure to select locations that would not be shaded in the future. Of course it will be a looooong time before our pecan trees are large enough to be a threat to the apples, but we're planning for the future!

Our apple trees are semi-dwarf, which means they can grow to be about 15 feet across. We measured out and marked an equilateral triangle with sides that measured 15'. Who said high school geometry isn't useful?

The night before we planted our trees we soaked them in buckets that contained a solution of liquid kelp in water. Our trees came bareroot and Michael Phillips, author of my much-beloved The Holistic Orchard: Tree Fruits and Berries the Biological Way,recommended soaking them in kelp overnight to help reduce transplant shock. I added about 2 tablespoons of organic liquid kelp to each bucket and then filled it with enough water to cover the roots.

Soaking the trees overnight in a kelp solution. Our storage
room is the coolest place I could find, so that's where the trees
landed until planting. 

The next morning dawned sunny and warm. Ideally, you would plant trees on an overcast, wind-less day. It's better for the plants. We didn't have much choice in the matter, however, so we trusted in the awesome  power of kelp to keep our trees from freaking out and got underway.

Please learn from my mistake: if you are going to dig halfway to China on a unseasonably sunny and warm spring day, apply your sunscreen with great care. I just kind of slapped it on and by the end of the day the back of my neck, ear lobes, part of my left cheek and triceps were burnt to a crisp. I look like I have some rare kind of skin disease.

It felt like we were digging to China 
Now for the hole.

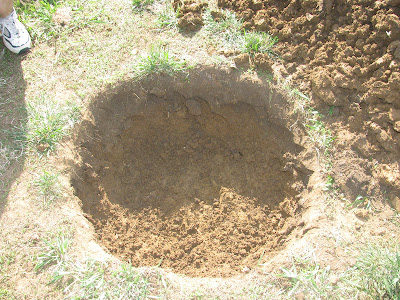
You need a hole that is about 3 feet wide and 16-20 inches deep. If you are digging through clay, you will want to give up about halfway but persevere! A large hole means you are loosening a lot of soil and your tree will pay you with abundant growth.  We tried to break up the sides of the hole as much as we could because "otherwise [the roots] may circle around the glazed bowl that can inadvertently result from clay particle adhesion caused by digging the hole." (Phillips, 52)

After you have dug your hole, you will look at your small tree and wonder if it will be completely swallowed up by the giant chasm that you just made in your lawn. Nope, because the next step is to take some of the best quality dirt (i.e. topsoil, not clay) plus the amendments I will discuss and form a mound of loose soil on the bottom of the hole. Gently place your tree on top of the mound and spread the roots out.


Hubby Dear placed the tree on the mound of loose soil and spread the roots out

Check the graft union - that's the bumpy part where the rootstock has been joined to the trunk. Make sure it is about 4 inches above the level of the ground. If you plant your tree too deep, the rootstock might send out growth of its own and the resulting tree would not be the variety that you desire. As you add dirt back into the hole and tamp down the soil, the tree will settle a bit so it is important that the graft union starts off high enough.

Now let's talk soil amendments. Michael Phillips recommends the following: 

Organic soil amendments to add at planting: rock phosphate, mycorrhizal inoculant, azomite, and humic acids

Each tree gets 1 lb of rock phosphate and 1 lb of azomite. We mixed this as well as some humic acids into the mound at the bottom of the hole and into the soil we filled in around the roots. The roots themselves were sprinkled with mycorrhizal inoculant.

What's mycorrhizal inoculant, you ask? Mycorrhizal fungi are present in healthy woodland and orchard soils. They partner with trees in a symbiotic relationship. It's too involved for me to write it all out here, but suffice it to say fungi are the key to healthy, happy, organically-grown fruit trees. Mycorrhizal inoculant is the best way to insure fruit trees have these fungal partners from the beginning.

After we dusted the roots with the inoculant, we continued to fill in the hole with the best dirt, reserving the worst of the clay for the top. The roots will thrive in the good stuff and the tree will grow strong quickly. The clay will get improved over time from the amendments that will be applied from above.

When we had the hole about 3/4 of the way filled in, we placed a stake on the side of the tree opposite of the prevailing winds.

Then we tamped down the soil firmly and watered well. I took some of the remaining chunks of clay and arranged them in a ring around the tree to help hold water in the root zone.


Our new Jonafree, GoldRush, and Enterprise apple trees

And that's it! Most people recommend that you do not fertilize fruit trees the first year after planting, so other than watering as necessary, they won't require too much attention this year.

Other than a whole bunch of  ramial mulch. But that's a post for another day. 

Friday, April 6, 2012

Using Your Food Storage: Black Bean Burgers

When a Facebook friend of mine raved about the easy bean burgers she had made for dinner this week, I knew I had to get the recipe. It's kind of strange since I am such a lover of red meat, but I really like bean burgers. I don't make them very often because all my recipes are rather time consuming. My friend's version, however, is quick, easy, and just so happens to use a food storage staple, vital wheat gluten.

Vital wheat gluten is the most important ingredient you can add to 100% whole wheat bread to help it turn into a fluffy, delicate loaf instead of a dense brick. It can also be used to make faux meat ("wheat meat", a.k.a. seitan), though I've never done that before. Vital wheat gluten  has a shelf life of 7-10 years, making it a good candidate for your long term food storage.

I made this recipe on a weeknight and it was indeed as quick and easy as my friend claimed. There was a delicious contrast between the crispy exterior and creamy inside of the bean burger. A burger that is healthy, delicious, and uses items I always keep in my food storage? I'm sold!

Bean burger and sweet potato fries. Yum!

Black Bean Burgers (Recipe adapted from Veganomicon: The Ultimate Vegan Cookbook)

1-15 oz. can black beans, drained and rinsed (OR about 1-2/3 c. cooked black beans [2/3 c. dry])
1 t. chili powder
1/2 t. cumin
Salt to taste
1/4 c. water
1 T. tomato paste (OR tomato powder reconstituted according to package directions)
1/4 c. finely chopped cilantro (OR substitute another herb to your taste)
2 cloves of garlic, minced (OR 1/4-1/2 t. garlic powder)
1/2 small onion, grated (OR 1-2 T. dried onion, rehydrated and then finely chopped)
1/2 c. vital wheat gluten
1/2 c. dry bread crumbs
Olive Oil
Buns

Mash the beans with a fork or potato masher in a mixing bowl. It's OK to have a few chunky bits. Add the chili powder, cumin, salt, water, tomato paste, cilantro, garlic, and onion and mix.

Add the gluten and bread crumbs, kneading with your hands until everything is well-mixed. Divide the mixture into six pieces and form into 1/2" thick patties.

Preheat a skillet over medium heat. Add enough olive oil to cover the bottom of the pan. Cook the patties in batches (don't crowd them in the skillet) until brown, about 3-5 minutes. Flip the patties and cook the other side. Serve on buns. I like mine with mayonnaise and jalapeno mustard. :)

Tuesday, April 3, 2012

March 2012 in Review, Part IV: First Aid and April Preps

Whew! This is the final part of my March prepping review. The last thing I did last month was to start chipping away at our first aid preps.


First Aid

I've had a first aid plan for a while but I haven't done much to build up our stockpile.


Triangular bandages, gauze, surgical masks, Ace bandages, Burn Jel and Coflex

This is but a drop in the bucket but at least I got started!


With March finally out of the way, here's what I have in store for April: 


  1. Plant our apple trees and blueberries bushes. I'll post in-depth instructions on how to start off your plants right. There's a lot more to it than just plopping your trees in a hole. 
  2. Get some more stuff for the chickens. The wee beasties are getting larger and I need to get some more items to keep them healthy and happy. 
  3. BOB upgrade. I'll buy a few more items to upgrade and update our bug out bags. 
  4. Food Storage. If I have room  in the budget, I'd like to buy some more #10 cans of milk
  5. Inventory our First Aid stockpile. I need to get a better idea of just how much we already have.  


So that's me! How are you prepping this month?

Monday, April 2, 2012

March 2012 in Review, Part III: A Whole Lot of Gardening

With the late Spring/early Summer-type weather we've been having, everything is about a month ahead of schedule. Our daffodils and forsythia have come and gone. The grass is lush and green and we've been working outside everyday. Here's what's going on in the garden. 

March Orchard Improvements

Our pitiful little cherry tree is finally getting some TLC

One of my goals this year is to make major strides towards establishing a survival orchard. I thought I should probably try and do something for this cherry tree I got for free four years ago before I start spending money on new trees! I pulled all the grass and weeds from around it in a 2' diameter. Then I bought some organic fruit tree fertilizer and gave it a generous serving. I'm pretty sure this is the first time I have ever fertilized this tree. Gee, I wonder why it is still 3 feet tall? ;) 

I learned from my orchard bible, The Holistic Orchard: Tree Fruits and Berries the Biological Way,that putting mulch right up against a fruit tree is a bad idea. It holds too much moisture against the trunk and is prime habitat for rodents that munch on bark. It is also a bad idea to lay down a circle of weed cloth underneath wood mulch or stone. Weed cloth creates an environment that favors bacteria at the expense of the fungi that are key to tree health. So, yes, I did that wrong when I planted my pecan trees last fall! It is better to put a thick layer of pea stone down and then mulch in a wider circle around that. Much more about mulch this month. (Hehe)

Spritzing and Spraying

I've spent a significant amount of my prepping budget over the last couple of  months on equipment and spray ingredients recommended in The Holistic Orchard for our fruit trees and berry bushes. The sprays aren't toxic pesticides or chemical fertilizers but are aimed at improving the overall health of the plants. It's all about helping the plant's own immune system fight off potential pathogens and insect pressure. Does this sound a bit New Age-y or otherwise weird? It's not, I promise! Read this for a bit more explanation.  


Solo 4 Gallon Backpack Sprayer
The weather has accelerated the spraying timetable so I've already sprayed two of four total spring sprays. I loaded up my nifty new backpack sprayer with a pungent concoction of water, neem oil, liquid fish, liquid kelp, effective microbes, and blackstrap molasses and slid on the 40+ lb contraption. It felt like a stubborn, smelly toddler was clinging to my back as I staggered across our homestead, spraying our cherry and pecan trees as well as the blackberry and raspberry bushes. Luckily, I'm used to stubborn, smelly toddlers so this was a breeze! 


Raspberries in the foreground, blackberries in the middle. Hopefully the holistic sprays will encourage bountiful harvests. 

Composting

We set up a compost bin primarily for chicken and rabbit waste. The majority of our food waste will be consumed by the chickens as they get older and we plan to use many of our spent garden plants as mulch in the chicken run.  


The bin is close to the coop and to the garden. 


When we were deciding where to set up the compost bin, we debated putting it somewhere that would be a bit out of the way but wouldn't be visible from the house. But then we remembered that our giant chicken run isn't exactly discreet! The compost bin is practically invisible in comparison.  

I'm looking forward to reducing the number of bags of compost we'll have to buy in the future for our garden endeavors. 

The Vegetable Garden

Hardly a day goes by when we're not planting something.


We planted onion transplants this year rather than trying to grow them from seed. 

Growing onions from transplants instead of seed seems like cheating, but maybe we'll actually get some good sized onions this year.


"Music" variety garlic

The garlic we planted last fall all sprouted and is doing great.


"Encore" lettuce mix and "Corvair" spinach

The first of many boxes of salad greens have sprouted. 


My usually June-bearing strawberries are in bloom

Last year's strawberries are blooming. In addition, we planted 75 new plants.


Peas! We outsmarted the mice this year

Hubby Dear's relentless trapping of mice in our garden has resulted in many more seeds surviving long enough to sprout. Yippee for peas!


I love our garden 

If you've been following my garden adventures, you might notice that we switched out the wooden lattice-style square foot grids for ones made of twine. We decided that the wooden grids simply take up too much room and make weeding and planting difficult. Hubby Dear installed metal screw eyes to the sides of the boxes and ran the twine through. We are much happier with the result.

Seed Starting Results

The seeds we planted in the little Jiffy Pot greenhouse took off rapidly. We're now in the process of hardening off the seedlings. 


Rosemary I overwintered indoors, the seedlings, and one of our new blueberry bushes


The sunflowers aren't enjoying the process very much and everything else is pretty leggy and windblown, but we may end up with a few successful transplants. We hedged our bets by directly sowing the same seeds in the garden and we'll keep whichever are the best looking plants in the whole lot. 

------

The beat goes on in April. More planting, hopefully we'll start harvesting! Coming soon: planting apple trees and blueberries.


Have you started your garden yet? What's growing at your house?