Friday, March 22, 2013

Link to a Must-Read Post PLUS DIY Seed Starting Rig Update

First, I wanted to share an interesting post about how many seeds to store/how much land you need to survive from The Survivalist Blog. If you haven't read it yet, be sure to check it out as it has some food for thought. You need to store many more seeds than you may think!

Second, remember that DIY Seed Starting Rig I made? We have been putting it to hard use and have made a few adjustments to it with experience.

Here is what it looks like today. There are plants growing on four levels of the shelving unit. If we massively increase our garden in years to come, we'll definitely have to add another shelving unit, but this will work for now.


The rig in use


We started out with only one shop light per level, but soon found that the seedlings on the outer edges of the flats were bending toward the light.


Two shop lights work better than one. You can use one in a pinch, though. 


We rotated the plants so all would have nice, straight stems, but found that it was better to just add another shop light to each level. I am so pleased with the results that we have gotten so far.


'Dwarf Blue Curled' Kale


'Farao' cabbage. These babies need transplanted soon. 


'Waltham 29' Broccoli' 

Our broccoli plants are getting extra TLC at the moment. They got a little stressed for water (see below) and  appear to need some additional fertilization. I'm paying close attention to their moisture levels and dosing them with liquid kelp and effective microbes.

The above plants were all started a month and a half ago and are certainly large enough to be hardened off and transplanted outdoors. There's just one problem: we keep getting snow! We're supposed to get another 1/2 ft. of snow this weekend.


'Purple of Sicily' cauliflower - started on March 10. We just thinned the seedlings to one per pot.

You might also notice that we have ditched the toilet paper roll seed starting pots. They work fine, but they hold so little soil that they get dried out quickly and require transplanting up into large containers. I am lazy enough that those factors make a difference for me.


'Five Color Silverbeet' - Rainbow Chard

Last weekend we planted our first seeds that require additional heat to germinate - eggplant and peppers. Tomatoes are also in that category and will be started this weekend. We bought some seedling heat mats to place under the flats that hold heat-loving plants. They raise the temperature 20 degrees above the ambient temperature of the room.


The eggplants have sprouted

Apparently it is working because we have baby eggplants. I've never grown eggplants before.

Eight shoplights + two seedling mats = a perceptibly warmer room. We think the additional warmth in the area is one of the causes for the stressed broccoli. We are paying very close to attention to moisture levels so they will outlive the lingering winter weather and survive to get transplanted outdoors.


Have you started your spring garden yet? What is growing at your house? 

Monday, March 11, 2013

Getting baby chicks for the first time? Here' s what you need to know

If you walk into your local farm/feed store during this time of year, you are likely to be greeted by the sound of peeping chicks. Beware! Do NOT go and look at the chicks (or ducks, turkeys, rabbits, or whatever cute and cuddly creatures the store might be selling) unless you are prepared to bring some home. It has been scientifically proven that it is impossible to see baby poultry in a feed store without birds coming home with you. That's what I tell Hubby Dear, anyway. (Remember how I got into raising turkeys?)

I highly recommend that folks who can raise poultry, should. It is fun and an easy way to become more self-sufficient. Before you decide to bring home those sweet, fluffy chicks, however, you need a few basic supplies and a little bit of knowledge. I will lay out those essentials in this post.

Supply list: 

1. A brooder - A brooder is simply a confined area where baby poultry can be safely raised under controlled conditions. It can be as simple as a large cardboard box, an old stock tank, or a plastic storage tote. Hatcheries also sell brooder kits like the one pictured below.

We bought our brooder kit from Randall Burkey. 

That brooder was fine for 17 chicks for about 2-1/2 weeks. After that time, I gradually increased the size  of the area they had to roam. Day old chicks can do well with 6 sq. inches of space per bird, but you will need to increase that to 1 sq. foot by the end of the first week and 2 sq. feet per bird by 2-3 weeks of age. Chickens need 4 sq. feet of coop space and 10 sq. feet of run space per bird as an adult. They grow quickly so have a coop or at least a plan for a coop in place before you commit to getting chickens. 

Note: Chicks can and will fly. Turkeys are even more prone to aerial feats. You better have a plan to keep your birds inside the brooder once they can fly (about 2 weeks of age or so for chickens). Take it from me that it is not fun to step on a pile of turkey poo because your poults decided to be adventurous.


2. Brooder light – Mama chickens keep their babies nice and toasty by snuggling them under their wings. Assuming you don't have a broody chicken kicking around your place, you will need to be the mama for your birds and give them heat. Brooder lights are very inexpensive and easy to adjust for the correct temperature. You want the area directly under the light to be 95 degrees at chick level. Decrease the heat (by moving your light up) by 5 degrees every week until the temperature inside the brooder is the same as the ambient temperatures. 

The brooder light is on one side. Some folks claim using a red light decreases incidences of picking,
but as long as the chicks have adequate room and don't get bored, that is not likely to be a problem for you. 


Place your brooder light at one end of the brooder so that your chicks can get away from the heat if they get too hot. I always make sure the food and water is in the cool zone. The best way to tell if the temperature is correct is to watch their behavior. If they remind you of a day care run amok, things are probably just fine. It is normal for them to sack out in a pile under the heat lamp every so often. All babies need plenty of sleep. 


3. Bedding - You need an absorbent, non-slippery material for your chicks to live in. I use pine shavings, which are sold in compressed bales in any feed store. They smell nice and are very absorbent. I put about 3" of shavings in the bottom of my brooder and then cover it with a layer of paper towels for the first four days or so, changing the towels daily. After the chicks have learned to eat their starter feed and not pine shavings, the paper towels are no longer necessary. Do NOT use sheets of newspaper as bedding. They can be too slick for baby chicks and can lead to leg problems. Do NOT use cedar shavings because they cause respiratory problems.


Bales of pine shavings and lidded trash cans for feed storage - two essentials for  us.

I turn the litter regularly (actually, the chicks do an excellent job of that) and add more as necessary. You might be surprised to read this but my chicken coop is very rarely stinky. It doesn't smell like much of anything, to be honest. To quote the very inspiring Joel Salatin, "if you smell manure, you are smelling mismanagement."  The key to this is the deep litter method. The deep litter method is beyond the scope of this post, but if you are interested in learning the best way to manage manure, I suggest reading Harvey Ussery's book, The Small-Scale Poultry Flock.


4. Chick-sized feeders and waterers - You will want an appropriate-sized feeder and waterer for your chicks. I like to start out with the small quart-sized ones and move up to larger containers as they grow.


Midnight the Australorp getting her first drink. Note the marbles.

When you bring your chicks home, it is a good idea to gently put their beak in the water and make sure they take a sip. You can also put marbles in the rim of the waterer to make sure the chicks can't get in and drown.  


Lunch time! 

5. Chick starter - Chicks need to eat food especially formulated for their rapid growth. I buy bags of chick starter/grower, though some feed companies separate out those two categories. Each chick will eat about 10 lb of starter to reach 10 weeks of age, so buy accordingly. I try to keep a month's worth of feed on hand at all times, but no more than that lest it grow stale.

If you have ducklings, they can eat chick starter, but they need additional niacin. My ducklings get brewer's yeast added to their feed, which provides this essential nutrient. Turkey poults also appreciate the niacin and a higher protein "meat bird" starter will support their extra growth.

6. Chick-sized grit - The chicks won't need grit until they start eating foods other than chick starter. My chicks get treats of mashed hard-boiled eggs, torn dandelion greens, and other healthy goodies starting at about one week of age. At that time I give them access to a container of grit.

Three week-old chicks enjoying a snack of mashed hard-boiled egg


That's it! It's really not difficult and it is extremely rewarding. Good luck to those of you embarking on raising poultry for the first time this spring.


Resources I recommend:

  1. The Small-Scale Poultry Flock: An All-Natural Approach to Raising Chickens and Other Fowl for Home and Market Growers by Harvey Ussery 
  2. Storey's Guide to Raising Chickens, 3rd Edition by Gail Damerow


Wednesday, March 6, 2013

Perennial Vegetables to Establish Now for Your Survival Garden

I've been watching a series of old British TV shows called "The Victorian Kitchen Garden", "The Victorian Kitchen", and "The Victorian Flower Garden". I find it really relaxing to learn about gardening in days gone by. It's kind of like visual Valium for me.  I love it.

One of the things that these programs have done is to pique my interest in perennial vegetables. The Victorians grew a much wider array of vegetables than are commonly consumed today and many of them are perennials that will grow back year after year. If you establish several of these types of vegetables in your garden now, you will have them in place should an emergency situation occur. You could consider these plants to be living members of your food storage.

Perennials in the kitchen 

There are perennial vegetables mentioned in many of the episodes of the series listed above, but this episode of "The Victorian Kitchen" is the one that really got my wheels turning. If you start watching around 8:00, you will see the head gardener, Harry, come in with a basket of Jerusalem and Chinese artichokes for the cook, Ruth. The finished dish of Chinese artichokes is shown at about 10:30.


E8 Victorian Kitchen - The Dinner Party 


Don't those Chinese Artichokes look like some sort of insect larva? I'm not sure that I would have an easy time putting them in my mouth, but I'd enjoy giving it a go.  


Another reason to plant perennial vegetables - OPSEC

Besides the obvious advantage that perennial vegetables have in coming back every year with little help from the gardener, it is also worth noting that many don't look like vegetables to the uninformed. Jerusalem artichokes, for example, are a type of sunflower and could simply be a pleasing addition to your landscape. If the worst happens, the average Joe isn't going to recognize that your sunflowers have serious edibles growing underground.

This is what a Chinese Artichoke plant looks like. Does this look edible to you?
Image source: shizuokagourmet.com


What should you plant? 

There are whole books dedicated to perennial vegetables out there. (Try this one,especially if you live in warmer climates.) The following is a short list is composed of plants that will thrive in my Zone 5 climate. Many of these plants can be grown in climates both warmer and cooler than Zone 5. Follow the provided links to learn more about each plant and its needs. 


Asparagus - A classic, but, alas, no one in my family likes it. Maybe we can use it to barter. It must be grown for several seasons before you can harvest spears and even longer if you start with seeds rather than crowns.

Crosne (aka Chinese Artichoke) - Fool your friends and make them think you are eating insect larva! A plus for the time-crunched or fuel-conscious: these tubers can be cooked or eaten raw. 

Dandelions - Maybe you don't need to plant these in your garden, but you probably have them in your yard already. Just make sure you don't spray them with chemicals and you can eat them or feed them to your chickens.

Egyptian Walking Onions or other Multiplying Onions - The article I linked says that they "tend to be more reliable and productive, less day-length sensitive and less subject to the depravations of pests and diseases" than your standard onion. Yes, please! 

Good King Henry - I love the fanciful name of this plant. Apparently it is similar to spinach, though it also has edible flower buds and seeds. It can be grown in the shade, so if you have an area of your yard that is too shady for traditional vegetables, this would be a great option.

Lamb's Quarters - This is a plant that grows as a weed in many areas of the country. You can eat any of the above-ground parts of the plant and it can be used as a substitute for spinach. 

Lovage - Lovage can be grown as a substitute for celery and it was used for medicinal purposes in times past.

Patience Dock - This is a hard-to-find plant, but apparently worth the search. It is supposed to taste like spinach (Is that the perennial vegetable equivalent of "tastes like chicken"?) and is one of the earliest greens in the garden.

Russian Red Kale - I am a new convert to the wonders of kale. If you've never tried it before, it reminds me of broccoli, but in leaf form. My kids gobble it up and it is great livestock feed as well. Many varieties of kale self-seed readily, which makes kale a great addition to your perennial vegetable plan.

Rhubarb - Rhubarb is a popular spring dessert ingredient, but don't forget that the leaves are poisonous!

Skirret - This is a vegetable I had never heard of until I watched "Victorian Kitchen Garden". Apparently it was a favorite of Queen Victoria. The edible part of the plant is its roots. 

Sorrel (all kinds - Garden/Common, or French) - Tasty, lemony-flavored greens. 

Sunchoke (aka Jerusalem Artichoke) - This tuber is popular with chefs and can be eaten raw, roasted, or boiled and pureed.  This is one of the most attractive perennial vegetables to me simply because the plant is so pretty.

A sunny patch of sunchokes
Image source: http://myselfsufficienthome.com/jerusalem-artichokes/


I hope you find this list to be a useful starting place. I definitely plan to make perennial vegetables part of our garden in the future. 

Thursday, February 28, 2013

Indoor Seed Starting 101, Part Two

This is the second post in my series about starting seeds indoors. Click here for part one if you have not read it yet.
---------

Once your seeds have germinated and had a chance to grow a bit, it is time to thin your seedlings to one per pot.


Day Seven: Before Thinning


Snip, snip! 


Pick strongest seedling in each pot and use a pair of scissors to snip off all of the other seedlings. It can feel almost painful to cut healthy little seedlings, but I assure you that it is very important. You want to give the remaining seedling all the space, light, water, and nutrients so that it will grow big and strong.  We fed our thinned seedlings to our rabbits, which helped ease the pain a bit. Happy bunnies will cheer anyone up!


After thinning

                            
Tip #9: Thin your seedlings to an appropriate spacing. 

As the seedlings grow taller, keep an eye on the distance they are from your lights. You will have to move the lights up to maintain a 1-2" distance between the plants and the light. Don't forget to keep the soil moist, but not sodden, as well.

Tip #10: Check on your seedlings daily to monitor light and moisture levels. 

One extra thing you might consider doing is to set a fan blowing gently over the seedlings. This will help to strengthen their stems so they will be able to better withstand the elements when they get transplanted outdoors. Or, if you really want to be hands-on, you can softly run your fingers over the tops of the seedlings for one minute, two times per day. This supposedly will have much the same effect.

Tip #11: Strengthen those stems by running a fan. 


This is the sight that greeted me on my daily checkup seventeen days after sowing our cabbage, kale, and broccoli seeds.


'Farao' cabbage seedlings


'Dwarf Blue Curled' Kale


'Waltham 29 Broccoli'

All the seedlings were doing well, but we noticed that it was time to transplant the ones growing in the tiny toilet paper roll pots.


We moved the seedlings from the toilet paper roll pots into larger containers. 

The toilet paper roll pots work fine, but they do dry out more quickly than the plastic pots we made from recycled materials (pop bottles, milk jugs, etc.) and they only hold a tiny amount of soil. Rapidly growing plants need a bit more room.

It can be a bit tricky to transplant such tiny seedlings without harming them, but if you remember to only handle the seedling by the seed leaves (NOT the stem!), you will avoid damaging the plants.


Tip #12: Transplant as necessary. Handle only by the seed leaves, not the stem.

At this time, you should consider fertilizing your seedlings. The seed starting mix we are using is fortified with fish meal and provides enough nutrients for plants to make it to the transplant stage without additional fertilization. Many seed starting mixes are essentially void of nutrients, however, so you will need to fertilize. Use a gentle fertilizer like liquid kelp diluted in water and fertilize about once a week during one of your routine waterings. You can even make your own organic liquid fertilizers for free if you so desire.


Tip #13: Fertilize with liquid fertilizers once plants have true leaves. 


Keep caring for your seedlings like this until it is time to transplant them outdoors. Before you throw them out in your garden, however, you need to first harden them off.


See what a difference a decent light rig makes? Last year's transplants were super leggy, but at
least I hardened them off properly! Here they are hardening off on a shady porch
 between a rosemary plant I overwintered indoors and a blueberry bush. 

Hardening off is the process by which plants get acclimated to the outdoors. Start by placing a tray of seedlings in a shady area outdoors for a couple of hours. Gradually build up the time the plants spend outdoors and the amount of sunlight the plants are exposed to over a week or so. This is an essential step for happy plants that survive their final transplanting into the garden.

Tip #14: Don't forget to harden off the plants. 


That's it! Now you have all you need to know to grow healthy plants from seed indoors. Happy gardening!

Friday, February 15, 2013

Indoor Seed Starting 101, Part One

There may still be snow on the ground, but it is the perfect time here in Zone 5 to get our 2013 garden started. We had variable success starting seeds last year, but after Hubby Dear's research and an investment in infrastructure, we feel confident that this year will be more fruitful. Here's how we started our broccoli, cabbage, and kale transplants.

First, gather whatever pots you want to start your seeds in.


Toilet paper roll pots aren't just cheap - they really work great! 


We are using a mix of containers. Here is the link to my tutorial on making little pots out of toilet paper rolls.


Recycled containers drying after being dipped in a bleach solution


We are also recycling a variety of plastic containers. We washed them, drilled several holes in the bottom of each pot, and sanitized them prior to planting in a 10% bleach solution. Seeds and baby plants can be very delicate and mold or bacteria growth from an improperly cleaned container could kill them.


Tip #1: Sanitize recycled or previously used seed starting containers. 


In addition to containers, you will need a seed-starting mix. Seed-starting mix is different from regular potting soil in that it is sterile. Sterile conditions will greatly improve your chance to avoid the dreaded damping off disease and other issues that can plague seedlings started in potting soil.

You can make your own seed-starting mix. Here are a couple of "recipes" you can try: this one or that one.  We decided to go ahead and buy a large bag of it from Johnny's Selected Seeds and I noticed that even our local Wal-Mart is carrying organic seed-starting mix.


Tip #2: Buy or make a proper seed-starting mix.


The night before we planted our seeds, we poured out the amount of seed starting mix that we estimated we would need. Then we added enough water to moisten but not flood the soil. By noon the next day, the moisture level was perfect - similar to a wrung-out sponge.

Mini Me demonstrating the proper consistency of the seed starting mix

Since the soil would be consistently moist throughout, the seeds would get a serious head-start to germination.


Tip #3: Pre-moisten your soil prior to planting. 


Now that you have sanitized containers, moistened seed-starting mix, and, of course, some seeds, it's time for the fun part. Scoop the soil mix into the pots and then tap the container several times against whatever work surface you are using.


Tapping the pot

You will be surprised just how much the soil will settle when you tap the pot and eliminate air pockets. This is a simple trick that can make a huge difference in your results. Top off with more seed-starting mix if necessary and then lightly press the soil down with your finger


Tip #4: Tap, tap, tap that container! 


Then add your seeds. We put two seeds in each container.


Covering the seeds. These are "Farao" cabbage seeds. 

Then we lightly covered the seeds with soil so that the seeds would be at the depth recommended on the seed packet - about 1/4" deep for the type of seeds we planted (all are brassica or cole crops).


Planted! 

The next step was to lightly water the containers. We chose to use a spray bottle so we could gently mist everything.


Next, we placed a dome over our seed starting tray. We happened to buy a dome kit, but you don't need to get fancy. You can slide the whole apparatus into a plastic bag and it will work just as well. The point is to keep moisture in until germination occurs.


Tip #5: Keep things covered until the seeds germinate. 


Sprout little seeds! Note: we have our lighting rig on, but it is not necessary for germination. 

About 48 hours after we planted the seeds, the first cabbage sprouts poked their sleepy heads above the soil. Success!

As soon as the first seedling pokes out of the soil, take OFF your dome or plastic bag. Turn on your lights or put the seedlings in a sunny window. Here's the post about the DIY seed starting lighting rig we put together. The seedlings need a lot of light to grow into strong, sturdy plants. We have our lights on a timer so that the plants get about 16 hours of light a day.

Our cabbage sprouts on day three

Broccoli, cabbage, etc. will sprout just fine in our cool basement. The lights are 1-2" above the plants; this is to give the seedlings the optimum amount of light but it also warms them ever so slightly. We will have to provide supplemental heat for our tomato, pepper, and eggplants, however, since they are heat lovers.

Tip #6: Check heat requirements for the optimum germination. 

Cabbage on day five. 

I can already tell that this year's plants are going to be more sturdy than those we started in 2012. It is amazing how much of a difference the correct amount of light makes.

Tip #7: Let there be light! Lots and lots of light. 

Since the lights are on a timer, it takes very little of my time to care for the seedlings. They need to stay moist, but too much water can cause the seedlings to rot. We are watering from the bottom in an attempt to minimize that problem. We pour water into the bottom tray, let the plants soak up the water for 30 minutes, and then pour off any remaining water.

Tip #8: Water from the bottom. 


Don't forget to read Part Two of this post. I cover thinning, fertilization, transplanting to large containers, and hardening off in the next installments. 


Some Helpful References:

Best Tips for Starting Seeds Indoors, by Barbara Pleasant, "Mother Earth News", Dec 2012/Jan 2013
Mini Farming: Self-Sufficiency on 1/4 Acre by Brett Markham

Wednesday, February 6, 2013

A Healthy, Paleo-Friendly Food Option for Your Bug-Out Bag

I've been eating Paleo-style for the last couple of months and I have noticed great changes in my health. My digestive system is working well, my aches and pains are greatly diminished, and I've lost 15 lbs.

One of the challenges of a Paleo lifestyle for the preparedness-minded is that so many food storage staples are no-nos. I'm still working on replacements for a lot of the key foods, but I do have a great item I can recommend for your short-term food storage, particularly for bug-out bags (BOB).

A PaleoKit from Steve's Original

A PaleoKit is a vacuum-sealed package full of nutritious goodness. I am not a big beef jerky aficionado, but I really like this and consume the jerky, nuts, and dried berries with gusto. I eat at least one of these PaleoKits per week as a meal replacement. They come in several sizes: small (snack size), large (meal size), and even a 1,006 calorie MRE option. They are compact and can easily fit in a glove compartment, purse, or BOB.

I have tried both the original and the grass-fed versions of the PaleoKit. I hate to say it, but I prefer the original PaleoKit; the grass-fed beef jerky is quite tough and requires an extraordinary amount of chewing. The jerky in the original PaleoKits I've eaten has been quite tender.

The other thing to keep in mind about the PaleoKit is that it only has a shelf life of 5-6 months. That's because the food is very minimally processed and has no preservatives. The very thing that makes the PaleoKit great for health-conscious preppers works against it as a long term food storage item.


The ingredients list of a Grass Fed PaleoKit 

You could make your own version of a PaleoKit by vacuum-sealing jerky, nuts, and dried fruit in a FoodSaver bag. It would be cheaper for you to make it yourself, but at least where I live, it would be a challenge to find jerky without a bunch of junky preservatives. 

Another item I can endorse from Steve's Original is the PaleoKrunch grain-free granola bar. I have tried both the original and Espresso flavors and they are delicious! They are a great, healthy snack option with about a 6 month storage life. 

You can buy PaleoKits and PaleoKrunch bars directly from Steve's Original here. 

Do you have any healthy food items in your bug-out bags? If so, I'd love to hear your ideas. 

Monday, February 4, 2013

How to Make Seed Starting Pots from Toilet Paper Rolls

We have less than a week before we sow our first seeds of broccoli, kale, and cabbage. I am so excited to be getting started with this year's gardening tasks. While the year is young and nature is still hibernating, it's easy to be full of optimism and forget the failures of last year's growing season.

Hubby Dear and I are using mostly recycled materials as pots to start our seeds in. This is quite perplexing to my mother-in-law. She really doesn't get our homesteading activities - she grew up on a farm and is very happy to live in boring suburbia today - but when she heard about what we were going to do, she actually tried to drag Hubby Dear to a home improvement store so that she could buy us some "real" (plastic) pots! No thank you, mom.

I saw a picture of toilet paper roll pots on Facebook somewhere. I wish I remember where so I could cite the source, but it seems to be a pretty common idea. This exercise in frugality is also a great way to recycle toilet paper rolls, which are something that we have in abundance. Here's how to do it.  

Hubby Dear makes a great hand model, doesn't he? ;) 

Take a toilet paper roll.


Flatten it out in one direction.


And then flatten it in the opposite direction.


This will give your toilet paper roll four corners.


While the toilet paper roll is flat, cut it in half. You can make two tiny pots of the size suitable for seed starting from one toilet paper roll. We also used paper towel rolls and were able to get 5 pots from one of those rolls.


Now make small (1/2") cuts on the corners that you created by flattening the tube in two directions. There are four corners, so make four cuts.


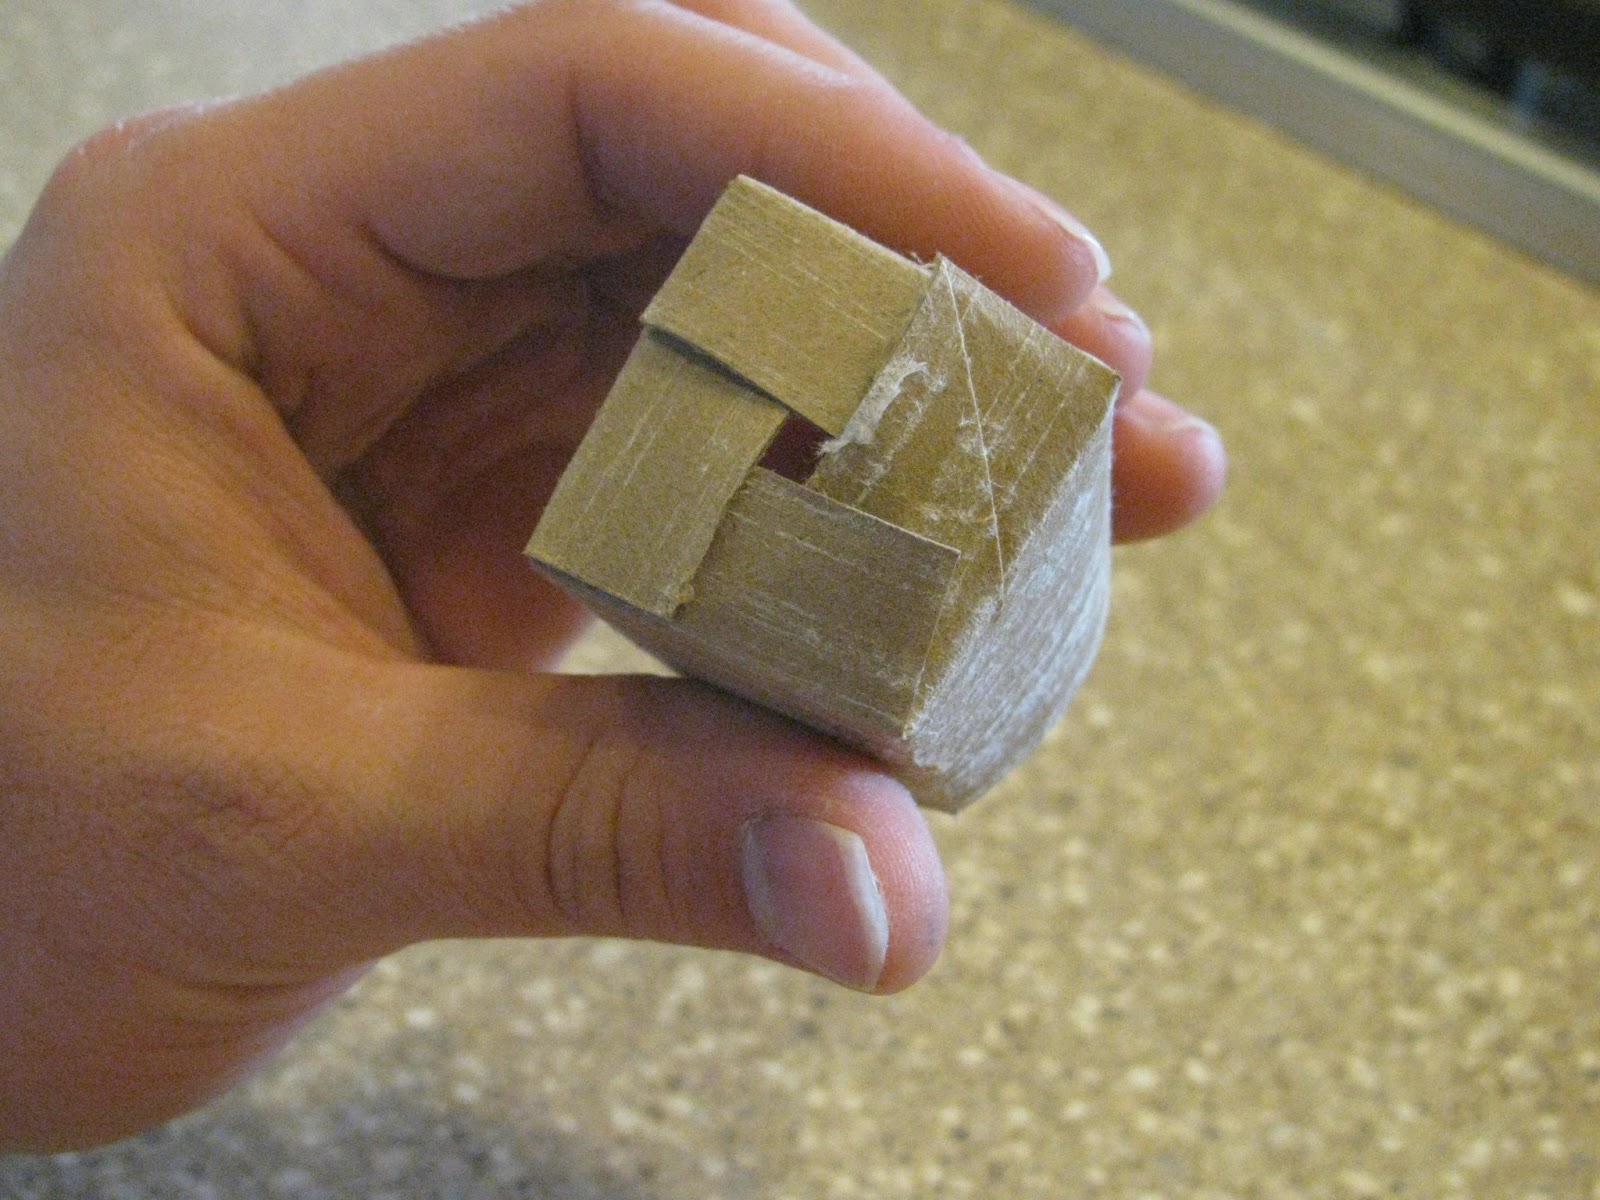
Here the tube has been cut and is now ready to be folded.


Start folding the flaps in to create the bottom of the tube.


If you tuck the flaps under just so, they will stay in place perfectly. It is just like how you can secure the top flaps of a cardboard box under each other.

The finished product

That's it! The finished pot is about the same size as the pots made from Jiffy Peat Pellets.  Once you get the hang of it, they come together very quickly.


We have about 64 of these little guys already made.


Eventually, the seedlings started in pots like these will grow too big for the container and will have to be transplanted. That's why we've saved our milk jugs, 2 liter bottles, etc. for the last month. No need to buy pots here!

We will plant our first seeds in less than a week, so I'll be able show these pots in action soon.