Showing posts with label canning. Show all posts
Showing posts with label canning. Show all posts
Friday, June 1, 2012
Deal Alert! Sale on Tattler Reusable Canning lids
Straight off the Tattler Facebook page:
SALE TIME!!! TELL YOUR FRIENDS!
Monday, January 9, 2012
Deal alert!
As posted by the Tattler Company on Facebook:
"40% OFF! That's the deal TATTLER will be offering this Thursday, 1/12/2012 on www.markdown.com ! This is a limited, one time offer of 100 Regular lids and 100 Wide Mouth lids bulk packed and shipped for $85.75! Quantities are limited on this custom pack, so tell your friends and visit markdown.com this Thursday 1/12."
I use Tattler canning lids and love the fact that I am able to use them over and over. You'd better believe I'll be jumping on this deal!
Sunday, October 2, 2011
September 2001 in Review and October Preps
September 2011 Preps
What did you accomplish in September? We had amazing weather all month long. We had very little rain or cloudy days and the highs were consistently in the 70s. The end result was picture-perfect fall weather. That encouraged this lazy woman to soak in the sun instead of prep or experiment with solar cooking devices.
What did you accomplish in September? We had amazing weather all month long. We had very little rain or cloudy days and the highs were consistently in the 70s. The end result was picture-perfect fall weather. That encouraged this lazy woman to soak in the sun instead of prep or experiment with solar cooking devices.
 |
| Even our sewage lagoon (our clay soil prohibits a septic tank) gussied itself up with a cloak of sunflowers this month. |
I did buy two bushels of apples and canned and dehydrated them. It was the first time I've used my Excalibur 9 Tray Food Dehydrator on something besides herbs and I was really impressed with how well it worked. I ended up with 3 quarts of dried apples that I'll use for desserts this winter and another 2 quarts of apples that I sprinkled with cinnamon and dried into crispy chips. The kids love snacking on those. I also made 3 pints of apple butter and 15 quarts of applesauce. Added to what was left from last year, we are fully stocked with apple goodness.
Our lovely weather is encouraging the garden to keep producing, albeit slowly.

I have enough green peppers frozen to last me until next summer's harvest. There are probably another 50 peppers still out there, so I think I'll try dehydrating the rest of them. We're still getting green beans from our remarkable zombie green bean patch and our raspberries are giving us the best harvest we've had from them yet. Not enough to can, but certainly enough for multiple batches of raspberry bars and fruit salad.
In between furious bouts of leisure and intermittent sprinklings of food harvesting and preservation, I also added some store-bought food to our food storage. I picked up some canned goods on sale at the grocery store as well as more clarified butter, coconut oil, freeze dried fruit, and tomato powder online. We are also prepared to stay warm during a winter power outage. And I'm excited to say that we were able to save up most of what it will take to buy the chicken coop of my dreams.
Oh, we also got one of these:
Mini Me has been obsessed with rabbits for about 2 years. We broke our "no pets in the house unless they live in an aquarium" rule and bought her this little guy for her birthday. Of course I also had to quickly buy a couple of months of food storage (timothy hay and alfalfa pellets) for the rabbit! That is not to be confused with using the rabbit for food storage. I don't think Mini Lops make good eating and it would definitely not be worth the trauma to our little rabbit lover.
What's in store for October:
Our lovely weather is encouraging the garden to keep producing, albeit slowly.

I have enough green peppers frozen to last me until next summer's harvest. There are probably another 50 peppers still out there, so I think I'll try dehydrating the rest of them. We're still getting green beans from our remarkable zombie green bean patch and our raspberries are giving us the best harvest we've had from them yet. Not enough to can, but certainly enough for multiple batches of raspberry bars and fruit salad.
In between furious bouts of leisure and intermittent sprinklings of food harvesting and preservation, I also added some store-bought food to our food storage. I picked up some canned goods on sale at the grocery store as well as more clarified butter, coconut oil, freeze dried fruit, and tomato powder online. We are also prepared to stay warm during a winter power outage. And I'm excited to say that we were able to save up most of what it will take to buy the chicken coop of my dreams.
Oh, we also got one of these:
 |
| Christened "Goldie Butterscotch", but mostly called "Bunbun" |
Mini Me has been obsessed with rabbits for about 2 years. We broke our "no pets in the house unless they live in an aquarium" rule and bought her this little guy for her birthday. Of course I also had to quickly buy a couple of months of food storage (timothy hay and alfalfa pellets) for the rabbit! That is not to be confused with using the rabbit for food storage. I don't think Mini Lops make good eating and it would definitely not be worth the trauma to our little rabbit lover.
What's in store for October:
- I'll be returning to the Sun Oven. I'm bound and determined to cook something properly! I think I'll go for bread next.
- After it frosts (Our frost date is quickly approaching ~Sigh~), we'll plant garlic. This will be the first time we've tried to grow garlic. Last spring we bought some garlic starts from the nursery as an impulse buy. They didn't do very well and therefore don't count! We bought a pound of "Music" variety organic seed garlic from Peaceful Valley.
- We have TONS of green tomatoes out there. I'll definitely have to do something with those before it frosts. I have several solutions in mind, so stay tuned for that.
- Maybe I'll do something with our pie pumpkins. We have about eight of them and while I enjoy using them as decorations, I'd like to try and cook at least a few of them.
- Hubby Dear and I will begin the infamous chicken moat this week. We priced out several options for fencing and discovered that this project is going to be more expensive than we thought. I'm sure it will also be more difficult than we thought, too. That's generally the way projects are at our house. Since we have never built fence before, it should be a grand
headacheadventure. - I'm still saving up for the chicken palace, but I should have some money in the budget to buy some miscellaneous preps. I'm not sure exactly what I'll buy, but it will definitely include food storage and probably more books. I'll keep you posted.
So that's me. What did you do in September and what do you have lined up for October?
Thursday, September 1, 2011
August 2011 in Review and September Preps
I'm a bit late with my monthly summary, but here it is. To cap off a very interesting August, both of our water heaters died last weekend. It took five days for the parts to come in and for the water heaters to get fixed. No hot water when you have four young children home making messes all day in the middle of canning season? Life gets complicated and everything takes about twice as long to get done. It's going to take a few days to unearth my house from under the debris of dirty dishes, kids, and laundry. I'm hoping September will be a better month.
August Garden:
Here's the bad news: the germination rate hasn't been great for our fall plantings.
We have a few tiny cauliflower and broccoli plants.
This is the box we have christened "The Box of Death". All the strawberries we planted last spring died and now only one cabbage seedling remains. Lots of seedlings sprouted, but they mysteriously died. What gives?
Our tomatoes are in a holding pattern. The insanely hot weather of July and early August caused the plants to drop flowers rather than produce fruit. Now the weather is better and flowers are setting, but we have to wait until the fruit is produced and ripe.
But there's good news.

The pumpkins are looking great. It won't be long before they're ready to pick. Our cucumbers and cantaloupe are consistently producing, too.
I'm harvesting and drying tons of cayenne peppers.
And, miracle of miracles, we have fresh green beans! Lots of them! Hubby Dear picked nearly two pounds just yesterday.
I reported last month that the green beans died, right? Well, in two of the boxes, the green beans bounced back and began producing with the mild weather we've been having. How strange is that? It's fun to have some garden serendipity instead of garden catastrophe.
August Preps:
What's coming up this September?
August Garden:
Here's the bad news: the germination rate hasn't been great for our fall plantings.
 |
| Cauliflower hanging in there |
We have a few tiny cauliflower and broccoli plants.
 |
| The Box of Death |
This is the box we have christened "The Box of Death". All the strawberries we planted last spring died and now only one cabbage seedling remains. Lots of seedlings sprouted, but they mysteriously died. What gives?
 |
| Brandywine tomato plant gone wild |
Our tomatoes are in a holding pattern. The insanely hot weather of July and early August caused the plants to drop flowers rather than produce fruit. Now the weather is better and flowers are setting, but we have to wait until the fruit is produced and ripe.
But there's good news.

The pumpkins are looking great. It won't be long before they're ready to pick. Our cucumbers and cantaloupe are consistently producing, too.
I'm harvesting and drying tons of cayenne peppers.
 |
| Green beans in September? |
And, miracle of miracles, we have fresh green beans! Lots of them! Hubby Dear picked nearly two pounds just yesterday.
I reported last month that the green beans died, right? Well, in two of the boxes, the green beans bounced back and began producing with the mild weather we've been having. How strange is that? It's fun to have some garden serendipity instead of garden catastrophe.
August Preps:
- In addition to the odds and ends I picked up at Cabela's, I bought some more items for our long term food storage: local honey, oil, mayonnaise, molasses and evaporated milk. I broke down and shelled out the mega bucks for a case of dry milk. We are getting so close to having a full year's supply of food. Exciting!
- I also added to our three-month supply: dry carrots, dry fruit, cornstarch, granola bars and cereal. My family is a crazy bunch of cold cereal addicts, so we have to build a big stockpile of it. Cereal is getting more and more expensive (like everything else these days) so it's a challenge to find bargains.
- Speaking of stockpiles, my budding toiletry stockpile was getting out of control. I had been just pitching items in the cabinets in our master bathroom and it was pretty chaotic. To solve this problem, I bought five storage bins and divided the stockpile into five categories: oral care, body wash & soap, skin care, deodorant, and hair care. The bins should hold about a year's supply of these toiletries for my family and items are much easier to find now.
 |
| The beginnings of my hair and skin care stockpile |
- I added these two books to my library: Back to Basics: A Complete Guide to Traditional Skills, Third Edition
and The Organic Fruit Gardener
.
- I've canned a bit of salsa, spaghetti sauce, pickled peppers, and cucumbers. I have two dynamite recipes to share with you soon.
What's coming up this September?
- I'm so excited! Global Sun Oven is lending me a Sun Oven to take for a test drive. I can't wait to put it through its paces. Will it really work? Is it worth the hype? Is it better for baking cookies than my mini-van? You'll be along every step of the way.
- Of course I'll continue building our food storage. I plan to dehydrate a bunch of herbs and freeze pesto. Apple season is upon us so I'll begin canning applesauce, apple butter, and try my hand at dehydrating apples, as well.
- The advent of cooler weather reminds me that we need to get a back-up form of heat for our house. We plan to get a wood stove at some point, but for now, a propane heater will have to do.
- I'm cutting back a bit on my prepping budget this month to start saving for my chicken coop. Hubby Dear and I are going to begin building the chicken moat this month. Since the two of us are ridiculously un-handy, that should be fun times indeed. Thankfully our marriage is strong enough to survive the trials and tribulations that are sure to unfold. ;)
What did you do to prep or in the garden during the month of August? What do you have planned for September?
Saturday, July 16, 2011
Review of Tattler Reusable Canning Lids PLUS My Best Blackberry Jam Recipe
Last month I bought 6 dozen Tattler reusable canning lids. I finally had a chance to put them to the test last week.

The typical canning lids available everywhere cannot be used more than once. They also contain BPA, which has been shown to be a health hazard. Not only are Tattler lids reusable almost indefinitely, but they also are BPA free. I was eager to give them a shot.
Each canning lid consists of a rigid plastic lid and a flexible rubber ring. The rubber ring takes the place of the sealing compound. You must also use metal canning lid rings but they are NOT included with the Tattler lids.
The procedure for using the lids is a little different. It is easy, but it definitely takes some getting used to.

Here's the recipe I used to put the Tattler through its paces. It is my favorite rendition of blackberry jam. I prefer to crush my berries with a food mill so I can control the amount of seeds that end up in the finished product.
Blackberry Jam
Blackberries to yield 4 c. crushed - read directions below. I find it takes me about 50 oz. of berries.
7 c. sugar
1/2 t. unsalted butter (this will help reduce foaming)
1-3 oz. pouch liquid pectin
Process blackberries through a food mill fitted with a berry screen. Run the pulp through the mill twice to extract the maximum amount of juice. Measure out 3 c. of juice and add 1 c. of the pulp back to yield 4 cups total.
(Note: If you do not have a food mill, you can just crush berries with a potato masher. Your jam will have more seeds and texture, but it will taste just fine.)
In a large saucepan, combine blackberries, sugar, and butter. Over medium-low heat, heat the mixture until the sugar is dissolved, stirring constantly. Increase heat to medium-high and bring mixture to a full rolling boil, stirring constantly. Stir in the pectin and boil for one minute. Stir, stir, stir! Remove pan from the heat and skim off any foam.
Allow jam to cool 5 minutes, gently stirring a few times. This will help keep the juice and fruit evenly distributed in the finished product. Ladle the jam into hot jars, maintaining 1/4 inch headspace. Add your lids and process the jam for 10 minutes in a 200 degree water bath.
Yield - About 8 half-pint jars
The typical canning lids available everywhere cannot be used more than once. They also contain BPA, which has been shown to be a health hazard. Not only are Tattler lids reusable almost indefinitely, but they also are BPA free. I was eager to give them a shot.
Each canning lid consists of a rigid plastic lid and a flexible rubber ring. The rubber ring takes the place of the sealing compound. You must also use metal canning lid rings but they are NOT included with the Tattler lids.
The procedure for using the lids is a little different. It is easy, but it definitely takes some getting used to.
- Scald the lids and rings. Keep hot while you prepare your product.
- Place the rubber ring on the lid and center the lid on your canning jar.
- Barely screw on the metal ring. Make sure the canning lid is centered on the jar, then hold the lid down with one finger as you tighten the metal ring.
- Once the ring is tight, unscrew it by 1/4 inch to allow for venting during processing.
- Process the jars according to your recipe directions.
- Once you have removed the jars from the cannner, carefully tighten the ring completely.
The trickest part of the procedure is tightening the ring after processing. The jars are extremely hot and even though I was using a pot holder, I still managed to burn my fingers.
So, do these lids work? After processing several jars of blackberry jam both with standard and Tattler lids, I would have to say yes. My first batch of 8 jars, all using Tattler lids, yielded three that failed to seal. I have never had a jar fail to seal in all my years of canning, and so I was really disappointed. However, I have learned from sad experience that if a product has received rave reviews and I have issues with it, it is more than likely operator error! I decided to try again.
My second batch of jam had 5 jars with standard lids and three with Tattlers. All the Tattlers sealed and two of the standard lids didn't seal. In my third batch, one of the standard lids didn't seal. I think the problem is more me than the canning lids! I'm thinking that maybe I didn't clean the rims and threads well enough before I put the lids on.
All in all, if you do a lot of canning, I think Tattler lids are well worth the investment. They are more expensive initially, but last practically forever. From a preparedness standpoint, they are essential. From an environmental and health perspective, they are great, too. I recommend them.
Here's the recipe I used to put the Tattler through its paces. It is my favorite rendition of blackberry jam. I prefer to crush my berries with a food mill so I can control the amount of seeds that end up in the finished product.
Blackberry Jam
Blackberries to yield 4 c. crushed - read directions below. I find it takes me about 50 oz. of berries.
7 c. sugar
1/2 t. unsalted butter (this will help reduce foaming)
1-3 oz. pouch liquid pectin
Process blackberries through a food mill fitted with a berry screen. Run the pulp through the mill twice to extract the maximum amount of juice. Measure out 3 c. of juice and add 1 c. of the pulp back to yield 4 cups total.
(Note: If you do not have a food mill, you can just crush berries with a potato masher. Your jam will have more seeds and texture, but it will taste just fine.)
In a large saucepan, combine blackberries, sugar, and butter. Over medium-low heat, heat the mixture until the sugar is dissolved, stirring constantly. Increase heat to medium-high and bring mixture to a full rolling boil, stirring constantly. Stir in the pectin and boil for one minute. Stir, stir, stir! Remove pan from the heat and skim off any foam.
Allow jam to cool 5 minutes, gently stirring a few times. This will help keep the juice and fruit evenly distributed in the finished product. Ladle the jam into hot jars, maintaining 1/4 inch headspace. Add your lids and process the jam for 10 minutes in a 200 degree water bath.
Yield - About 8 half-pint jars
Friday, July 15, 2011
Why I'm Not Canning Green Beans This Year

Normally, I'd be canning all those green beans. Not this year. Here's why:
- The beans don't develop all at once. We pick beans every other day and end up with enough beans to fill about two or three quart jars. While pressure canning green beans isn't hard, processing 2-3 qts every two days for weeks on end is kind of a drag.
- My family really doesn't care for canned green beans. There are few things more depressing than to proudly serve my home-grown and home-canned green beans only to have everyone avoid eating them. Well, Baby Dear loves them, but everyone else only eats them out of a sense of duty.
- My family will eat frozen green beans - and they couldn't be easier to prepare. They stay a vibrant green and are definitely not mushy. They also maintain more of their nutrition since they are significantly less processed.
How to prepare green beans for freezing:
 |
| Getting ready to blanch the beans |
- Wash the beans and remove the stem ends. I remove both ends of the bean, but you can leave the little curly end on, if you prefer.
- Bring a large pot of water to boil.
- Blanch the beans in boiling water for three minutes. Drain, then chill the beans in ice water for another three minutes. Drain. While it may be tempting, don't skip this step. You must blanch the beans to deactivate the enzymes in the beans. You'll end up with a much nicer end product with the blanching/chilling process.
- Package and freeze.
 |
| Vacuum sealed and ready for the freezer |
As a person who has made preparedness her hobby, I get in this mindset that all my food storage has to be shelf stable. I still love to can and I believe that the majority of my food storage should indeed be shelf stable. Sometimes you just gotta do what you like and do what works for your family. We're going to eat these green beans with pleasure and be a bit more self-reliant in the process.
Are we the lone canned green bean haters out there? How do you balance shelf-stable vs. perishable foods in your food storage?
Thursday, June 30, 2011
Reaction to Doomsday Preppers, Month Thirteen in Review and July Preps
I hope you all got a chance to watch "Doomsday Preppers" on Monday night. I enjoyed the show a lot and was pleasantly surprised it didn't have more of a "preppers are crazy" slant. Not that it was perfectly balanced and truthful, mind you. Read the Survival Mom's take on her appearance on the show if you haven't already. Some things (such as the night delivery of food storage) were staged by the production company and/or edited for dramatic effect. If you wanted to watch the show but don't have the National Geographic Channel, here ya go. (If you're reading my blog in a feed reader, you may have to come to my actual blog site to get the YouTube box to show up.)
What I accomplished in June:
1. A whole lot of gardening. Gardening may be work, but it is so rewarding to reap the rewards from your efforts. We ate all of our radishes. Our lettuce and salad mix keeps producing and has yet to turn bitter. We've also been eating regular English peas and pod peas all month, though they are pretty much done. I made a few pickled beets from The Thinker's crop and they were d-e-l-i-c-i-o-u-s! The Thinker also provided us with cabbage that I made into bierocks. Who knew homegrown cabbage was that much better than store-bought? It had such a delicate flavor and super-crisp texture.
3. Stocked up on canning supplies. I did go ahead and buy 6 dozen Tattler Reusable Canning Lids. I haven't needed to use them, so I can't really give an opinion about them yet. I did happen to buy some for my mom for Mother's Day (We're a practical family, can you tell?) and she seems to like them. I really need more jars, but they weren't in the budget this month.
4. A bit more food storage, of course. I got some bottled lemon juice for canning purposes, a case of dry milk, and some spices.
5. First Aid. I picked up another box of nitrile gloves. I really was intending to buy more in this category, too, but you'll see that I spend the remainder of my budget on #6.
6. Added to our Survival Library. I love books, real books. You won't find me anywhere near akook Nook or Kindle. I selected these titles to add to our Survival Library:
Oh, and the book about chickens? Let's just say there's something called a chicken moat in our future...
7. Hubby Dear and I also did a massive de-cluttering and reorganization of our storage room. We dropped off the kids for a weekend of candy-fueled hyperactivity with Grandma and completely filled our van with items to donate.
I forgot to take a "before" picture, but it was bad. The middle of the room was pretty much covered with stacks of buckets and pieces of disused furniture.
Now the buckets are tucked underneath the stairs with my water storage. The process of taking everything out of the storage room helped me to update our inventory spreadsheets. Now we have a very good idea just what we have and what we need to purchase.
8. I also learned how to make yogurt from dry milk and had waaaaaay too much fun doing it. I've become such a food storage dork! Click here to read how to do it. It's easy and it really works.
JULY PREPS:
I have changed my prepping plan for July about five or six times already. Originally, I had intended to split my budget between several categories (defense, first aid, food storage, and miscellaneous). Then I started watching the Sun Oven videos posted by Crystal from EverydayFood Storage.Net and so I wanted to buy one of those. I still do want to buy a Sun Oven and everything else on my list, but I feel Spirit's whispering to me to finish our food storage. It's never a good idea to ignore the Holy Spirit (remember what happened to Jonah?), so I think July will be one of those mega-food storage months.
What I accomplished in June:
1. A whole lot of gardening. Gardening may be work, but it is so rewarding to reap the rewards from your efforts. We ate all of our radishes. Our lettuce and salad mix keeps producing and has yet to turn bitter. We've also been eating regular English peas and pod peas all month, though they are pretty much done. I made a few pickled beets from The Thinker's crop and they were d-e-l-i-c-i-o-u-s! The Thinker also provided us with cabbage that I made into bierocks. Who knew homegrown cabbage was that much better than store-bought? It had such a delicate flavor and super-crisp texture.
 |
| Time to make hay while the sun shines! |
2. Got a dehydrator and experimenting with drying garden produce and herbs. We bought an Excalibur 9 Tray Dehydrator and a ParaFlexx Non-Stick Drying Sheet (Yes, only one for now. I want to try it out on some fruit leather before I buy enough sheets for all my trays.) The only thing I have dried thus far is oregano, but I know I'll be giving it quite the workout over the next few months. I'll post more reviews as I try other applications.
3. Stocked up on canning supplies. I did go ahead and buy 6 dozen Tattler Reusable Canning Lids. I haven't needed to use them, so I can't really give an opinion about them yet. I did happen to buy some for my mom for Mother's Day (We're a practical family, can you tell?) and she seems to like them. I really need more jars, but they weren't in the budget this month.
 |
| Tattler Reusable Canning Lids |
4. A bit more food storage, of course. I got some bottled lemon juice for canning purposes, a case of dry milk, and some spices.
5. First Aid. I picked up another box of nitrile gloves. I really was intending to buy more in this category, too, but you'll see that I spend the remainder of my budget on #6.
6. Added to our Survival Library. I love books, real books. You won't find me anywhere near a
- The Resilient Gardener: Food Production and Self-Reliance in Uncertain Times
- Storey's Guide to Raising Chickens: 3rd Edition (Storey's Guide to Raising Series)
- Root Cellaring: Natural Cold Storage of Fruits & Vegetables
Oh, and the book about chickens? Let's just say there's something called a chicken moat in our future...
7. Hubby Dear and I also did a massive de-cluttering and reorganization of our storage room. We dropped off the kids for a weekend of candy-fueled hyperactivity with Grandma and completely filled our van with items to donate.
 |
| After: Glorious Floor Space! |
I forgot to take a "before" picture, but it was bad. The middle of the room was pretty much covered with stacks of buckets and pieces of disused furniture.
 |
| Buckets tucked out of the way |
Now the buckets are tucked underneath the stairs with my water storage. The process of taking everything out of the storage room helped me to update our inventory spreadsheets. Now we have a very good idea just what we have and what we need to purchase.
8. I also learned how to make yogurt from dry milk and had waaaaaay too much fun doing it. I've become such a food storage dork! Click here to read how to do it. It's easy and it really works.
JULY PREPS:
I have changed my prepping plan for July about five or six times already. Originally, I had intended to split my budget between several categories (defense, first aid, food storage, and miscellaneous). Then I started watching the Sun Oven videos posted by Crystal from EverydayFood Storage.Net and so I wanted to buy one of those. I still do want to buy a Sun Oven and everything else on my list, but I feel Spirit's whispering to me to finish our food storage. It's never a good idea to ignore the Holy Spirit (remember what happened to Jonah?), so I think July will be one of those mega-food storage months.
- Add to our long term food storage. We're getting much closer to having a year's supply!
- Try to find an aloe plant. Not really food storage (though some people drink aloe juice), but something good to have on hand.
- Keep up in the garden.
- Eat, can, freeze, or dehydrate our garden produce. Stock up on canning supplies.
Tuesday, May 31, 2011
Month Twelve in Review and Month Thirteen Prepping Plan
I don't know about you, but the current events of the last month have really encouraged me to keep prepping. I've been only at this for a year and I feel even more fired up about preparedness than I did a year ago. I hope you all have made strides in your family's preparedness over the past month. Here's what I did:
Month Twelve in Review:
1. Added more $ to our BOBs/at-home emergency fund. It wasn't much, but I did put some of the cash left over from our vacation in our BOBs. Even small amounts add up if you're a consistent saver!
2. Finished up the "leftovers" from Month Eleven. I bought another case of toilet paper (I think we have about eight months worth at the moment) and got my improvised Bucket Berkey water filter.
3. Bought some additional preparedness and food storage-related books for our home library.

I bought Where There Is No Doctor , Where There Is No Dentist
 , Seed to Seed: Seed Saving and Growing Techniques for Vegetable Gardeners
 , and the SAS Survival Handbook
Combined with the books I bought last month, I have a ton of great reference material. I'll be posting reviews of all the books over the next month.
4. We continued to build our food storage. We bought 15 more pounds of honey and some more evil (but occasionally useful) shortening at Sam's, but mostly I spent my budget at Honeyville Grain and Emergency Essentials. I added more vital wheat gluten, freeze-dried veggies, split peas, barley, lentils, black and kidney beans, and freeze-dried fruit. We finally have a year's worth of legumes for our family. Whew! At least there's one item I can check off the list.
5. We were very busy in the garden. We weeded and planted, but didn't need to water very much due to all the severe weather! We're enjoying the fruits of our labor and can't wait for that first ripe tomato!
6. Enjoyed a safe vacation with my family. Disney World was fun, but there is no place like home.
My goals for June include:
1. Getting a dehydrator and experimenting with drying garden produce and herbs.
2. I want to stock up on canning supplies. I need more jars and I want to try out those reuseable canning lids.
4. More food storage, of course. Also some first aid items, as my budget permits.
What preparedness projects do you have planned for this summer?
Month Twelve in Review:
1. Added more $ to our BOBs/at-home emergency fund. It wasn't much, but I did put some of the cash left over from our vacation in our BOBs. Even small amounts add up if you're a consistent saver!
2. Finished up the "leftovers" from Month Eleven. I bought another case of toilet paper (I think we have about eight months worth at the moment) and got my improvised Bucket Berkey water filter.
3. Bought some additional preparedness and food storage-related books for our home library.

I bought Where There Is No Doctor
Combined with the books I bought last month, I have a ton of great reference material. I'll be posting reviews of all the books over the next month.
4. We continued to build our food storage. We bought 15 more pounds of honey and some more evil (but occasionally useful) shortening at Sam's, but mostly I spent my budget at Honeyville Grain and Emergency Essentials. I added more vital wheat gluten, freeze-dried veggies, split peas, barley, lentils, black and kidney beans, and freeze-dried fruit. We finally have a year's worth of legumes for our family. Whew! At least there's one item I can check off the list.
5. We were very busy in the garden. We weeded and planted, but didn't need to water very much due to all the severe weather! We're enjoying the fruits of our labor and can't wait for that first ripe tomato!
6. Enjoyed a safe vacation with my family. Disney World was fun, but there is no place like home.
My goals for June include:
1. Getting a dehydrator and experimenting with drying garden produce and herbs.
2. I want to stock up on canning supplies. I need more jars and I want to try out those reuseable canning lids.
4. More food storage, of course. Also some first aid items, as my budget permits.
What preparedness projects do you have planned for this summer?
Sunday, May 15, 2011
Want to learn more about canning meat?

Granny Miller's blog has an awesome tutorial. If you've thought about canning meat but have been intimidated by it, check out her post here. It is very thorough and informative.
If you haven't read my posts on canning meat, you can find them here.
I've finished all my laundry from our vacation, so now would be a good time to fire up the ol' pressure canner...
Saturday, March 19, 2011
Food Storage Blitz Month, Part Three
My next contribution to Food Storage Blitz Month is another 12 pints of meat.
Since I learned how to can meat, I have been slowly adding to my stores of canned chicken and ground beef. It's easy for me to do and Hubby Dear is very thankful that he won't ever have to subsist solely on rice and beans.
Speaking of Hubby Dear, the disaster unfolding in Japan led him to admit to me that he's actually glad that I am building up our food storage. He's come a long way, hasn't he?
 |
| Canned chicken breast and ground beef |
Since I learned how to can meat, I have been slowly adding to my stores of canned chicken and ground beef. It's easy for me to do and Hubby Dear is very thankful that he won't ever have to subsist solely on rice and beans.
Speaking of Hubby Dear, the disaster unfolding in Japan led him to admit to me that he's actually glad that I am building up our food storage. He's come a long way, hasn't he?
Monday, January 3, 2011
But How Does It Taste? Home Canned Meat, Take Two
Last month I canned both chicken and ground beef. It was surprisingly easy but the question remained – would it be tasty? Recently, I decided to put the canned chicken to the test.
I picked a recipe that I knew would be a true test of the chicken's abilities. It’s called Creamy Chicken Fettuccine - sautéed chicken breasts thrown together with a quick cream sauce, peas, fettuccine, and Parmesan cheese. It's the kind of dish that is easy to put together on a weeknight and is definitely a crowd-pleaser. It’s also a dish where funky chicken would have nowhere to hide. I knew my canned chicken was going to have its work cut out for it in this recipe. I didn't tell Hubby Dear or the kids that I was using canned chicken so as not to prejudice their opinions beforehand.
I brought up one of the jars of chicken from my storage room and this is what it looked like upon opening:

Looks a little scary, doesn't it? I had to remind myself that this was going to be edible and deeee-licious.

I knew the chicken would be tender after being pressure cooked, but even so, I was a bit surprised at how soft it ended up being. If you've ever cooked boneless skinless chicken breasts in the crockpot, the texture was similar but even more yielding.
The original recipe calls for sauteeing the raw chicken breast in a couple of tablespoons of butter. Obviously my chicken was already cooked, but I thought briefly cooking it in the butter might liven it up and get rid of some of the canned taste.

Not so much. Mainly it served to break the chicken down even further. I continued on with the recipe as it was written and here's what it looked like:
The verdict:
Although I didn't reveal my secret ingredient until he had gone back for seconds, Hubby Dear could tell there was something up right away. He later told me the texture of the chicken reminded him of tuna. We both agreed that canned chicken would be much better in a casserole. Of course, I knew that ahead of time, but I just couldn't resist the challenge.
Was the canned chicken horrible? No. But it was also not as good as fresh.
Was canning chicken worth it? Definitely. It is a huge time saver to pop open a jar of pre-cooked, pre-trimmed chicken. Canning meat is super easy and you just need the right application for using it.
Coming up: Canned chicken in one of my family's favorite casseroles. Will anyone notice this time?
I picked a recipe that I knew would be a true test of the chicken's abilities. It’s called Creamy Chicken Fettuccine - sautéed chicken breasts thrown together with a quick cream sauce, peas, fettuccine, and Parmesan cheese. It's the kind of dish that is easy to put together on a weeknight and is definitely a crowd-pleaser. It’s also a dish where funky chicken would have nowhere to hide. I knew my canned chicken was going to have its work cut out for it in this recipe. I didn't tell Hubby Dear or the kids that I was using canned chicken so as not to prejudice their opinions beforehand.
I brought up one of the jars of chicken from my storage room and this is what it looked like upon opening:

Looks a little scary, doesn't it? I had to remind myself that this was going to be edible and deeee-licious.

I knew the chicken would be tender after being pressure cooked, but even so, I was a bit surprised at how soft it ended up being. If you've ever cooked boneless skinless chicken breasts in the crockpot, the texture was similar but even more yielding.
The original recipe calls for sauteeing the raw chicken breast in a couple of tablespoons of butter. Obviously my chicken was already cooked, but I thought briefly cooking it in the butter might liven it up and get rid of some of the canned taste.

Not so much. Mainly it served to break the chicken down even further. I continued on with the recipe as it was written and here's what it looked like:
 |
| In the finished product |
Although I didn't reveal my secret ingredient until he had gone back for seconds, Hubby Dear could tell there was something up right away. He later told me the texture of the chicken reminded him of tuna. We both agreed that canned chicken would be much better in a casserole. Of course, I knew that ahead of time, but I just couldn't resist the challenge.
Was the canned chicken horrible? No. But it was also not as good as fresh.
Was canning chicken worth it? Definitely. It is a huge time saver to pop open a jar of pre-cooked, pre-trimmed chicken. Canning meat is super easy and you just need the right application for using it.
Coming up: Canned chicken in one of my family's favorite casseroles. Will anyone notice this time?
Thursday, December 9, 2010
I Canned Chicken and Ground Beef...and Lived to Tell About It
I did something recently that had intimidated me for the longest time: I canned chicken breast and ground beef. For some reason, canning meat has always seemed mysterious, difficult, and possibly dangerous. After all, it was only this past summer that I used my seriously vintage (60-70 years old and going strong) pressure canner for the first time and canned green beans from our garden. I made Hubby Dear check and double-check that I was following the directions correctly so that I didn't blow up my kitchen. We survived and my canning confidence grew exponentially. Yesterday I threw caution to the wind and stepped into the world of canning meat.
Folks, if you have been holding back on canning meat for any of the reasons I listed above, stop! Canning meat is so easy. In fact, chicken breast is the easiest thing I've ever canned, period. It really couldn't be simpler. Here's how to do it.
Put 2-3" of water in the bottom of your canner and then load your jars in. Put the lid on and allow to heat. Once you see steam exiting the top of your canner, start timing. The steam needs to exhaust for 10 minutes. After the 10 minutes, I shut the petcock (the vent where the steam exits - this controls the pressure in the vessel) and watched until the pressure in the canner reached 10 lb. I have a dial gauge canner. You might have a weighted gauge canner which is different. Check your manual for instructions specific to your model. Process at 10 lb of pressure for 75 minutes. If you are at an altitude higher than 1,000 ft above sea level, you will need to check a canning reference for adjusted times/pressures.
6. Check every so often to make sure your canner maintains 10 lb of pressure for the full 75 minutes.
You might have to adjust the temperature on your stove. It takes remarkably little heat to keep the
canner going.
7. After the 75 minutes, turn off the heat. When the pressure reads zero, open the petcock. I wait a
couple of minutes before I open my canner, just for insurance. Open the canner lid AWAY from
you and remove the jars. They are still very hot, so be careful.
8. I let the jars rest on my counter undisturbed for at least 12 hours. My jars and lids were a
bit greasy and schmutzy, so I put some white vinegar on a kitchen towel and wiped them clean.
9. Label jar with the contents/date canned and enjoy! For best quality, use within a year.
Canning ground beef is very similar, but there are a few differences.
What's the point?
Why should you can your own meat? Well, if you like to eat meat, you'll definitely want to have some on hand if you're living off your food storage! I know Hubby Dear gets grumbly if I feed him too many vegetarian meals in a row.
Does home canning meat save you money? Here's what I found:
Vs.
7 lb of boneless, skinless chicken breasts - 14.05 + tax
12 pack of pint jars with lids - 10.69 + tax
I added in tax and prorated the cost for the 7 jars I filled with chicken. It came to 18 cents per ounce. If I hadn't had to buy any canning jars or lids, it would have cost me only 13 cents an ounce.
If you get a crazy good deal on chicken and have a ready stock of canning jars, home canning meat will indeed save you a few pennies.
What about the taste?
I don't know! I haven't tried it out yet, but I've heard great things about home canned meats. I'm going to do a blind taste test of my home canned chicken vs. the Member's Mark chicken I have in storage and I'll post the results.
Folks, if you have been holding back on canning meat for any of the reasons I listed above, stop! Canning meat is so easy. In fact, chicken breast is the easiest thing I've ever canned, period. It really couldn't be simpler. Here's how to do it.
- Pack your jars with chicken. I trimmed and sliced chicken breasts into large chunks and placed the pieces in clean canning jars. A pint jar will hold about 1 lb of chicken. Maintain 1" headspace. (For those new to canning, that means fill the jar with meat up to 1" from the top of the jar.)
- Pour hot water into the jars over the chicken. Some people skip this part. A couple of my canning books said to add water, and I followed their advice.
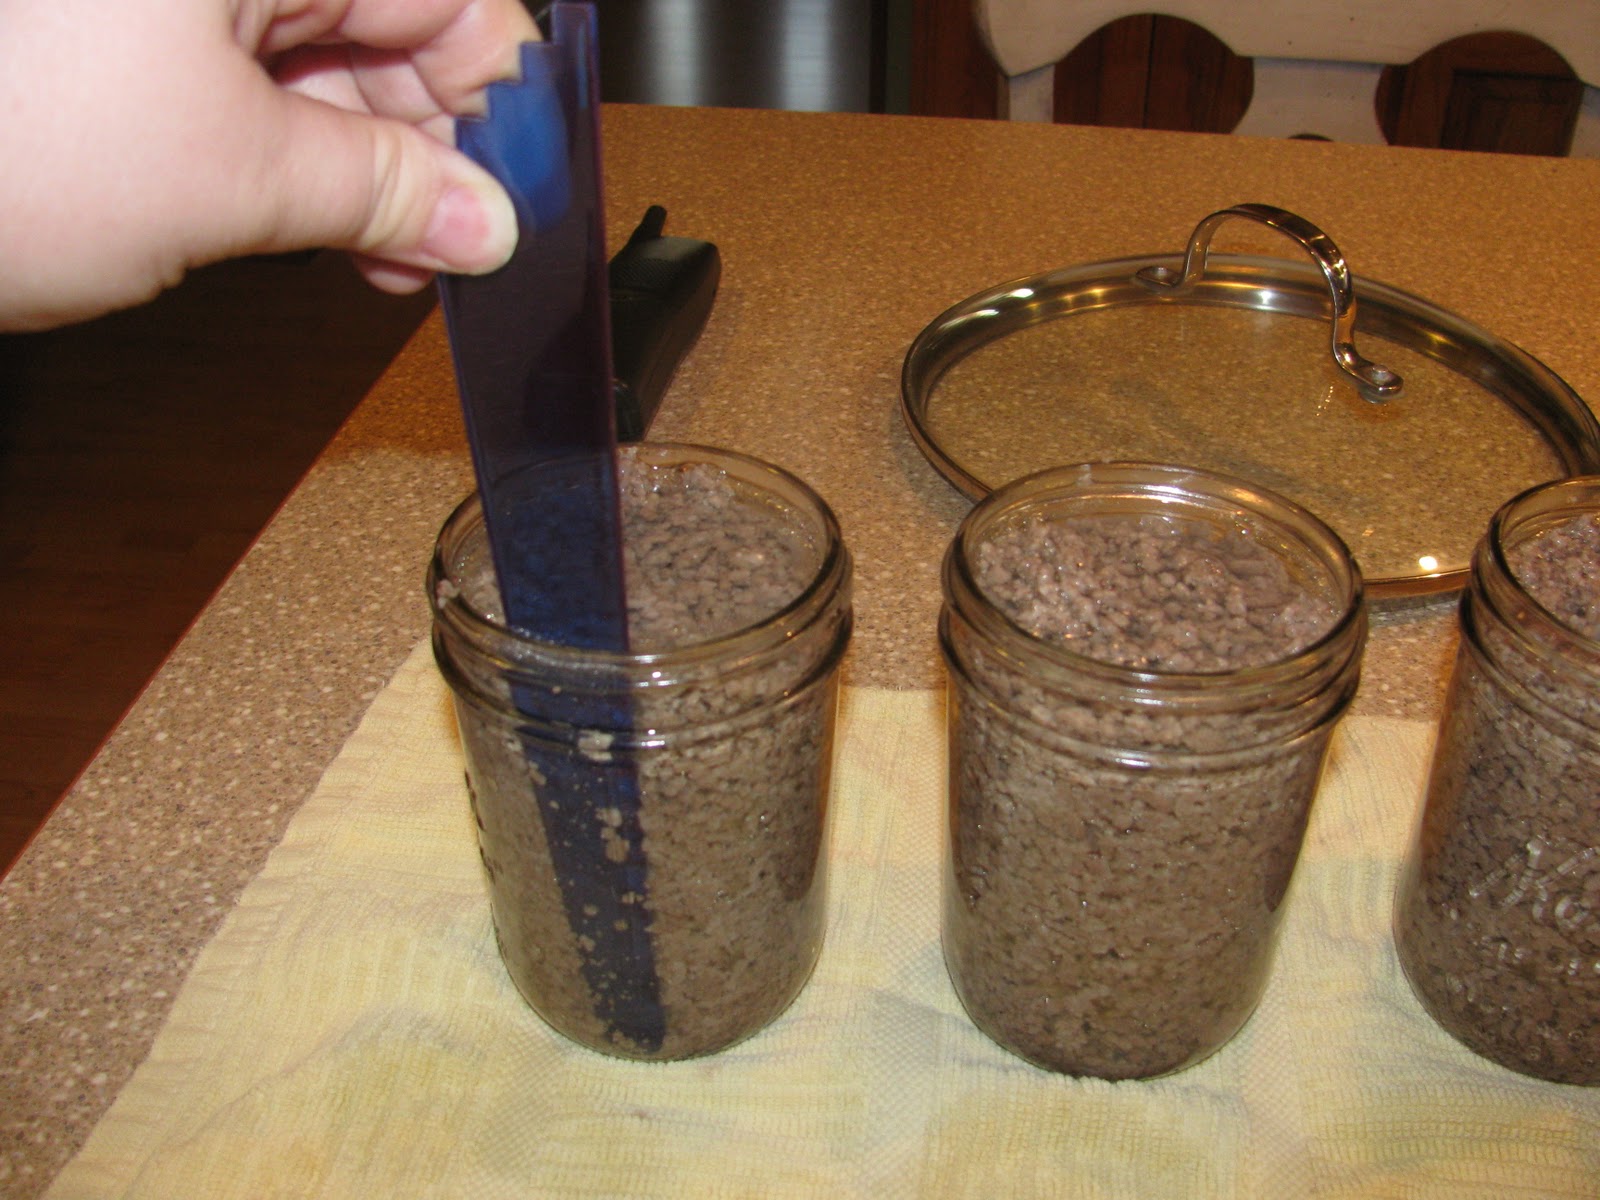
- Free any bubbles and adjust water to maintain the 1" of headspace. Run a plastic knife or bubble freer around the edge of the jar a couple of times. It was amazing just how many bubbles were trapped in the jar. I had to top each jar up with water to keep the headspace at 1".
- Clean off the jar rims with a damp paper towel. I had chicken gunk all over the rims of mine. If you don't take the time to clean the rims, your jars might not seal properly.
- Place boiled lids on the jars, tighten rings to "finger tight", and can it!
 |
| Chicken packed into jars |
 |
| Using the bubble freer to release any air from the jars |
 |
| Ready to can |
6. Check every so often to make sure your canner maintains 10 lb of pressure for the full 75 minutes.
You might have to adjust the temperature on your stove. It takes remarkably little heat to keep the
canner going.
7. After the 75 minutes, turn off the heat. When the pressure reads zero, open the petcock. I wait a
couple of minutes before I open my canner, just for insurance. Open the canner lid AWAY from
you and remove the jars. They are still very hot, so be careful.
8. I let the jars rest on my counter undisturbed for at least 12 hours. My jars and lids were a
bit greasy and schmutzy, so I put some white vinegar on a kitchen towel and wiped them clean.
9. Label jar with the contents/date canned and enjoy! For best quality, use within a year.
 |
| The finished product |
Canning ground beef is very similar, but there are a few differences.
- You need to brown your beef ahead of time.
- Put the browned beef in clean, hot, canning jars (a pint holds just under 1 lb of cooked ground beef), reserving 1" headspace, and pour some boiling water up to the 1" level.
- Free any bubbles, adjust headspace if necessary, wipe rims, etc. The remainder of the process is identical to the chicken. Process for 75 minutes at 10 lb of pressure.
 |
| 5 lb of ground beef, browned and ready to be canned |
 |
| Freeing bubbles from the beef and water |
 |
| Et voila! |
What's the point?
Why should you can your own meat? Well, if you like to eat meat, you'll definitely want to have some on hand if you're living off your food storage! I know Hubby Dear gets grumbly if I feed him too many vegetarian meals in a row.
Does home canning meat save you money? Here's what I found:
 |
| Sam's Club chicken |
5-13 oz cans of "Member's Mark" chicken at Sam's Club - $9.98, not including tax. When I add in our crazy-high local taxes, it came out to 15 cents per ounce.
Vs.
7 lb of boneless, skinless chicken breasts - 14.05 + tax
12 pack of pint jars with lids - 10.69 + tax
I added in tax and prorated the cost for the 7 jars I filled with chicken. It came to 18 cents per ounce. If I hadn't had to buy any canning jars or lids, it would have cost me only 13 cents an ounce.
If you get a crazy good deal on chicken and have a ready stock of canning jars, home canning meat will indeed save you a few pennies.
What about the taste?
I don't know! I haven't tried it out yet, but I've heard great things about home canned meats. I'm going to do a blind taste test of my home canned chicken vs. the Member's Mark chicken I have in storage and I'll post the results.
Sunday, November 28, 2010
Month Six in Review and Month Seven Preps
Did you think this past month seemed to fly by? I can't believe November is already drawing to a close. I also am astonished that I've been actively prepping for only seven months. I've learned so much and accomplished quite a bit.
Month Seven:
 |
| RIP oil lamp chimney |
Month Six of my prepping plan was a doozy. I had a humbling experience with primitive technology, bought a bunch of freeze-dried and dehydrated items for my food storage, stocked up on the necessities to have lighting during a power-down scenario, as well as accomplished the other items in my plan for this month.
In the negative column, I'm still not doing very well with adding in exercise, unless you count using my new grain mill. Hey, it does make me break a sweat! Also, the glass globe/chimney on my oil lamp met a premature demise when I was dusting it yesterday. This goes to show that A) I need to have some back-up chimneys on hand with my other supplies and B) My contention that housework is evil does have a basis in fact.
Month Seven:
- Continue to build food storage basics. Perhaps take advantage of holiday sales and stock up on items like spices, chocolate chips, canned pumpkin, etc.
- Buy some ground beef and chicken breast and pressure can it. Conduct a taste test and see how my home-canned meat fares vs. store bought canned chicken.
- Create a first aid kit for for my purse. I'm thinking of making one in a Altoid tin.
- Buy an electric grain mill and put it through its paces.
- Begin the process of organizing some of my canned food storage for easier rotation. I'm going to try out and review one of the can rotation devices on the market.
- In the category of "Hope Springs Eternal": Exercise 3x per week.
Tuesday, November 23, 2010
Tattler Canning Lid Giveaway
Kendra at New Life on a Homestead is giving away a bunch of Tattler reusable canning lids. Haven't heard about Tattler lids? Well, read this and this. Regular, one-use lids have always seemed wasteful to me, and if you are in a survival situation, you definitely won't be able to run to Wal-Mart and pick up some more canning lids.
I've been wanting to try these out and I'd love to win this giveaway. If I can't win it, I'd love one of my readers to! It's easy - head on over to Kendra's blog and leave a comment on the post about this giveaway. Good luck!

I've been wanting to try these out and I'd love to win this giveaway. If I can't win it, I'd love one of my readers to! It's easy - head on over to Kendra's blog and leave a comment on the post about this giveaway. Good luck!
Sunday, October 10, 2010
My name is Emily... and I'm an applesauce-aholic.
The applesauce I made last month has been a big hit with the whole family. It kicks Musselman's and Mott's respective tushies. I have been eating, breathing and dreaming of applesauce. I can't help it. I keep making more of it.
In my spare refrigerator is another two bushels of apples. Over the next few days, all 80 lbs of apples will be turned into more applesauce and apple products of all descriptions.
On the left is the Chunky Applesauce I made last month. I had to peel, chop and smush all those apples by hand. Next is the same thing, only cooked with the skins on and processed through a food mill. Even though the skins were eventually removed from the sauce, they still gave it a pink color. The third sauce is called "Rich and Spicy Applesauce". It has the addition of brown sugar and spices. Yum! The last jar is full of what I call "brown gold" - apple butter.
One factor in my new applesauce addiction is my handy dandy new food mill. Someone recommended the Roma Food and Vegetable Strainer to me and wow, will it ever revolutionize my canning. A whole new world of canning possibilities is now open to me from tomato sauce to ketchup to pumpkin to... applesauce. :)
I had a very hard time putting the food mill together for the first time. I pretty much have zero mechanical aptitude, but I managed to get it together eventually. The second time was a snap, though. I'm slow, but I learned. :) It is pretty sturdy and should last a lifetime, provided I don't figure out a way to screw it up. There are different strainer cones available for different types of produce. It comes with one that is for soft, squishy foods like tomatoes and apples.
First, you core and roughly chop the apples and cook them until they are soft.

Then you load up the super-sized hopper, turn the handle (The Thinker and Mini Me love to help with this part) and voila!
The pulp comes out one way

And the waste goes out the other

The result is a smooth, skin and seed-free sauce.
I need to buy more canning jars. The applesauce awaits!
In my spare refrigerator is another two bushels of apples. Over the next few days, all 80 lbs of apples will be turned into more applesauce and apple products of all descriptions.
 |
| A rainbow of apple products, made by me |
One factor in my new applesauce addiction is my handy dandy new food mill. Someone recommended the Roma Food and Vegetable Strainer to me and wow, will it ever revolutionize my canning. A whole new world of canning possibilities is now open to me from tomato sauce to ketchup to pumpkin to... applesauce. :)
 |
| The food mill, set up and ready to go |
I had a very hard time putting the food mill together for the first time. I pretty much have zero mechanical aptitude, but I managed to get it together eventually. The second time was a snap, though. I'm slow, but I learned. :) It is pretty sturdy and should last a lifetime, provided I don't figure out a way to screw it up. There are different strainer cones available for different types of produce. It comes with one that is for soft, squishy foods like tomatoes and apples.
First, you core and roughly chop the apples and cook them until they are soft.

Then you load up the super-sized hopper, turn the handle (The Thinker and Mini Me love to help with this part) and voila!
The pulp comes out one way

And the waste goes out the other

The result is a smooth, skin and seed-free sauce.
I need to buy more canning jars. The applesauce awaits!
Tuesday, September 14, 2010
Fall canning fun
Our family stopped by a local fruit farm last weekend and I bought a bushel of apples. I have been canning for three years, but up until now I've only used the produce from our garden or that of my parents.

Since this was my first time canning apples, I naturally thought I needed one of these:

A Food Mill. This makes perfectly smooth applesauce. I had been eyeing one of these for some time to use in canning tomato sauce.
I also wanted one of these apple peeler/slicer/corers.

Although I ordered both of these some time before our trip to the orchard, they have not arrived yet. Amazon's Super Saver shipping may be free, but quick it ain't.
What else was I to do but find recipes that did not require either of those two useful gizmos?
I broke out my favorite canning book, Blue Ribbon Preserves by Linda J. Amendt, and made a batch of Apple Preserves. Holy glycemic index, Batman! There are 5 cups of sugar in this recipe.

They are very tasty, though I would reduce the amount of nutmeg the next time I make it.
The other recipe I made was Chunky Family-Style Applesauce. Since you are aiming for a chunky texture, it doesn't matter if you lack a food mill.

When I tried it, it tasted like biting into a perfectly ripe, tart apple. Delish! I used fresh apple cider in both of these recipes which I think enhanced the end result.
I have 7 half-pints of Apple Preserves and 7 quarts and a pint of Chunky Applesauce to show for my efforts. I have enough apples left for one more batch of something. I'm thinking about making Apple Butter.
Wherever you live, I encourage you to preserve fall's bounty so that you can enjoy it this winter. I'm going to make another trip to the apple orchard soon, so I'm going to be busy for a while.
THE RECIPES
Apple Preserves
Makes about 6 half-pint jars (Emily's note: It made 7 for me.)
7 c. cored, peeled and sliced 1/4 inch thick tart apples
1 c. apple juice (I used cider.)
2 T. strained fresh lemon juice
1/2 t. unsalted butter
5 c. sugar
1-3 oz. pouch liquid pectin
1 t. nutmeg
1/4 t. ground cinnamon (I am going to add less nutmeg and more cinnamon next time.)
In an 8-qt pan, combine the apples, apple juice, lemon juice and butter. Over medium heat, bring the apple mixture to a boil. Reduce the heat and simmer, covered, until the apples are tender, about 8 to 10 minutes.
Remove the cover and add the sugar, 1 cup at a time, stirring gently between each addition. Heat, stirring constantly, until the sugar is completely dissolved. Increase the heat to medium-high and bring the mixture to a full rolling boil, stirring constantly. Stir in the entire contents of the pectin pouch. Return to a full rolling boil, stirring constantly. Boil, stirring constantly, 1 minute. Remove the pan from the heat. Skim off any foam. Gently stir in the spices.
To prevent floating fruit, allow the preserves to cool 5 minutes before filling jars. Gently stir the preserves to distribute the fruit then fill the jars, leaving 1/4" headspace. Process half-pints in a 200 degree water bath for 10 minutes, pint jars for 15 minutes.
Chunky Family-Style Applesauce
Makes about 4 pint jars or 2 quart jars (It made 2 quarts and nearly a pint for me.)
7 lb unblemished firm apples
2 c apple juice or water (I used cider.)
1 1/2 to 2 cups sugar
2 T strained fresh lemon juice
Core, peel, and chop the apples.
In an 8-qt pan, combine the apple juice or water and 1 c. of the sugar. Over medium-low heat, stirring constantly, heat the mixture until the sugar is completely dissolved. Add the apples.
Over medium-high heat, bring the fruit micture to a boil. Reduce the heat, cover and boil gently until the apples are soft and translucent, about 20 minutes. Stir occasionally to prevent sticking. Remove the pan from the heat.
Using a potato masher or the back of a large spoon, gently crush the apples to the desired texture. Stir in the remaining sugar to taste and add the lemon juice.
Over medium-low heat, stirring constantly, heat the mixture until the sugar is completely dissolved. Increase the heat to medium and bring the mixture to a boil. Reduce the heat and simmer, stirring frequently, until the sauce thickens, about 10 minutes. Remove the pan from the heat.
Ladle the sauce into hot jars, filling the jars about 1/3 full. Using a plastic spoon, press out any trapped air bubbles. Fill jars 2/3 full and repeat. Fill the jars, leaving about 1/2 inch headspace. Using a plastic knife or bubble freer, remove any remaining trapped air bubbles. Process both pint and quart jars in a 200 degree water bath for 20 minutes.
Subscribe to:
Posts (Atom)


